|
In this video I am showing you my entire workflow of fine art black and white photo conversion in photoshop. This is a sped up video, but even so it is easy to follow and understand all the steps. I am using pen tool for selections and blending 3 different exposures, then I am adjusting colours and contrast, and finally I add two small birds to the photo, so you can see some elements of composite photography. Last steps are a conversion into black and white in Silver Efex Pro and I add a vignette. If you are into black and white photography, I have yet another video tutorial on the subject, with commentaries. My Youtube channel with free photoshop tutorials Buy fine art photo prints at my store on SmugMug. Photography workshops in Tokyo - click for more details. Hire a photographer in Tokyo Copying Chinese calligraphy classics is the main way of studying Chinese calligraphy, and it has been practiced for over 3500 years. In this video I am copying a short fragment from a 4th century classic by the calligraphy sage Wang Xizhi. It is a text of Heart Sutra in semi cursive script. If you wish to learn more about Chinese calligraphy, its history, classics, great Masters and masterpieces, feel free to visit learning section on my website. To view my Japanese and Chinese calligraphy portfolio, see here. Photo editing & Chinese and Japanese calligraphy tutorial videos Buy fine art calligraphy prints at my store in my store on Fina Art Amercia. In most cases, brush tool is used for masking in photoshop, and brushing with white or black colour on the layer mast to reveal or conceal the layer below. Brush is also used for skin retouching, also for dodging and burning, and so on. However, it can also be used for removing unwanted items from a photo, in places and instances when the content aware tools and clone stamp tool fail to do the job. In this photoshop tutorial I will show you how you can use the brush in conjunction with layer blend modes to remove things that have to go from your photo, and improve the impact the and the composition of your shot. My Youtube channel with free photoshop tutorials Buy fine art photo prints at my store on SmugMug. Photography workshops in Tokyo - click for more details. Here is my next photoshop tutorial. This time I am giving you guys a simple tip on levels adjustment layer, and how to use them in conjunction with masking and digital blending. Recently I create more and more fully manual HDR images, I still use Photomatix and HDR efex pro 2, but not as often as I used to. It seems that manual blending, although more time consuming, produces (most of the time) better results or me. Levels in photoshop is a simple but very powerful tool, just like curves. I use levels and curves when editing nearly every photo. It is good to know how it works. Enjoy the video! My Youtube channel with free photoshop tutorials Buy fine art photo prints at my store on SmugMug. Photography workshops in Tokyo - click for more details. In this photoshop tutorial I will show you how you can easily combine texture of what is in a photograph, with any text. Most of photoshop users knows how to use the text tool, but in this video I will teach you a few cool tricks that will make any added text look really cool. By embedding the very texture of what is in a photo with the shape of the text, new tools and possibilities open and you can use your creativity to personalise any caption that you want to add to the picture. This tutorial is short and not difficult so even if you are a photoshop beginner you should have no problems with following it. My Youtube channel with free photoshop tutorials Buy fine art photo prints at my store on SmugMug. Photography workshops in Tokyo - click for more details. In this photoshop tutorial I will show you how to use channels in order to make very complex selections that would be impossible to accomplish with other photoshop tools, like magic wand, quick select, quick mask, pen tool, or even special plugins, like Topaz ReMask. Each of photoshop selection making tools has its use, and it is good to know which one to use in what circumstances. Channels are perfect for making complicated selections of areas where colour contrast is quite substantial, though there is a way of combining channel selections via calculations menu in photoshop, but this is a subject for next video tutorial. I will use channels to select sky in photoshop, and separate it from the trees, and rooftops. Enjoy! Lots of artists use watermarks or signatures to mark their art, and they do so for various purposes. Some want to protect their work, some simply add a signature as a final touch, and others use it a business card, a sort of stamp to make it easy to find them, in case someone wishes to buy their art. Whatever the reason it might be, and if you are one of those artists that want to add a watermark to their photo or a painting in photoshop, this video is perfect for you. I am showing you how to add a personal signature to a photo, and then some cool effects options that you can play with, like bevel and emboss, or textures. If you enjoy the video, please make sure to like it and subscribe to my channel for more free photoshop and photography tutorials! I always wanted to record one of my photoshop manipulations to give you an idea on how it looks like. It is a few hours shrunk into 12 minutes, showing the whole process, from the RAW file to a final image. Photoshop manipulations are a great fun, and also the best way to advance your photo shop skills from good to great. This type of art is also very helpful for any composite photography editing. Finding the balance and harmony between the perspective, light, and colour, is the key to a successful photoshop manipulation. Incidentally, I am launching new service menu - photoshop manipulation and photo retouching. If interested please contact me directly.  For all of you who wish to advance your photoshop and photo retouching skills, I am announcing photoshop workshops in Tokyo. I will create a special menu tab on my website this week, with all the details. For the time being I am offering only private lessons (one to one), either at your place, mine or via internet (online desktop sharing). You can view my photography and photoshop manipulation portfolio here. If interested please feel free to contact me and book your lessons! Left: original photo, that I took yesterday (model: Asuka), and below is a photo manipulation created in photoshop. 
Contrast of tones and colours is often an overlooked step in post processing, but in certain photos, like night photography, contrast makes a HUGE difference in the final appearance of the shot. I usually apply contrast twice or three times during post processing, and in this video I am showing you my final touches in regards to contrast.in this video, I am using curves selectively, which means that I am limiting the tonal range of curves level adjustment layer effect. Curves are an extremely powerful tool, and a photo can be actually accomplished by exclusive use of curve layers, so it is really important to master this and include them in your post processing workflow. I use curves for contrast, tones, colour correction, cross processing, and so on.  Chinese calligraphy of the Northern Wei dynasty (北魏, 386 - 534 C.E.) has one of the most powerful standard script styles in the history. If your calligraphy is lacking the bones and structure, you should definitely study masterpieces of this period. It happens so that from this month my obligatory montly subject for my next year's Master Instructor exams is one of the most famous classics of this period - the 鄭羲下碑 (Jap.: Teigi ka hi). The most characteristic features of this style are the rounded stroke (so called enpitsu in Japanese / 用筆) and the the strokes being between the standard and clerical scripts.
The work to the left is my copy of this classic. Since the original is carved in a natural stone, I edited it in photoshop so it resembles characters carved on a hard stone-like surface. This work is available in a print form in my store, here. I bet you saw many images online that were shot during daytime and you were puzzled how come the skies are so smooth or water is so silky. Well, that is a trick used by photographers for many many years now, and it is usually achieved by attaching an ND (neutral density) filter to the lens. ND filter is nothing more but a piece of glass that reduces the amount of light that travels through the lens onto the sensor, which allows for slowing down the shutter speed. However, even though using ND filter gives probably the best and most natural looking results, you can fake that effect in photoshop, and it is not difficult at all! Watch this video tutorial to find out how it is done. For more photoshop tutorials visit my Youtube channel. Composite photography is one of the most creative types of this amazing visual art. It allows for manipulating not just one photo but putting many photos together. It is a great way not only to learn composition of a photo, developing one's artistic skills, but also mastery of the photoshop tools. In this tutorial I am using a background photo and another complex composite shot of a Japanese model, which I converted into a cyborg or an android sci fi vision. Just so you know, both photos were shot by me in Tokyo, so this makes it even more cybertron-like. Anyways, I hope that this tutorial will help you guys with creating better composite images. Clone stamp tool is one of the most powerful tools in photoshop, and I am sure you all use it quite often during photo retouching. Personally, I use the clone stamp tool a lot when I edit my urban shots or architecture shots, where the patterns are geometrical and precise. In such cases the use of content aware based tools is usually not the best idea. But most of the architecture shots will involve a perspective, meaning, that objects that are further away will appear smaller than those closer to us. So, if you use a clone stamp tool as it is in photoshop tool menu, then when you sample a given area, no matter where you stamp it on the canvas, the size of that sampled area will not change. In other words, the sampled area close to the camera, will match the same pattern positioned further from the camera. In this video I will show you how to use the clone stamp tool in conjunction with the vanishing point filter in photoshop, and teach you how you can clone stamp in perspective. For more photoshop tutorials and photo editing tips and tricks, please visit my YouTube channel. Pixelation and pixel bending can be quite annoying and ruin visually the most amazing photos. Issues with pixels appear either when the editing was pushed far enough to damage pixels, or tonal transitions in the photo range from very dark to very bright tones, and vice versa. There are a few ways of dealing with pixelations, and I discuss all the methods that I use in this video tutorial. I show there a few tricks that you can easily apply in photoshop during post processing, or even saving the final file. I also talk about DeNoise plugin from Topaz Labs, which is a phenomenal piece of software, and I use it for noise reduction and dealing with pixelation and pixel bending. For more photoshop tutorials and photo editing tips and tricks, please visit my YouTube channel. Black and white photography is timeless. Its simplicity and beauty, which is based only on 256 tones, is unsurpassed. However, it is not an easy task to create a good black and white photo. In order to do so, one has to think and see in black and white before the shot is taken. Certain colours, such as green, red, brown, or blue, will distinguish themselves in a colour photo, but once converted to black and white the visual difference between them may be dramatically reduced, causing the whole scene to look bland and boring. The key to a good black and white photography is knowing how to manipulate with light and dark tones and the contrast between them. Post processing of a black and white photo may take much longer, and may require much more precision than one would normally need for a colour photo. Why? Watch this video and find out. Perspective distortion is often an overlooked step in photo editing. I often see online great shots with great composition and lighting, but the distorted perspective ruins everything at the end. In this short video tutorial I will show you how I fix perspective distortion in photoshop. In this next episode of my photography tips and tricks and photoshop tutorials I will explain not only how to recognise camera dust in post processing, but also talk about how the dust gets into your camera, how to reduce the dust spots on your photo by adjusting aperture, and show you many photoshop tools that can be used to deal with it during retouching, including removal of camera dust from complex textures, such as architecture. If you are interested in my other photoshop tutorials or HDR photography tutorials, please visit my YouTube channel. Here is another video tutorial on photoshop and lightroom techniques. In this episode I will guide you through a process of retouching eyes, from basic clean up, through increasing the brightness of the irises, adding or enhancing catch lights, accentuating eyebrows and eyelashes, and even on how to use the liquify tool. This is a second part to my other video on skin retouching, which can be found here. My new photo editing tutorial on how to transform the mood in your photo into a steampunk coolness. In this video I am working on a photo that I published in my article on Japan in Photography, which you can find here. Also, check out my other video tutorials. I have launched a new menu on my website, titled "photography tutorials", where I will be posting my youtube channel videos on photography techniques, and image post processing. I plan to cover many various subjects in my videos, though my main focus will stay with HDR image capturing and post processing, as well as the photo processing software, such as HDR efex pro 2, photomatix, photoshop, lightroom, topaz and nik software products, and so on. You will find there both short and long video tutorial for beginners, intermediate and advanced levels. In the future I also might venture into photo manipulation, composite photography and digital art. You can find all my videos on youtube channel, this site here, or my google+ account. Suggestions, ideas, and requests are more than welcome! For cool daily photos from Japan, visit my blog at www.japan-in-photography.com! 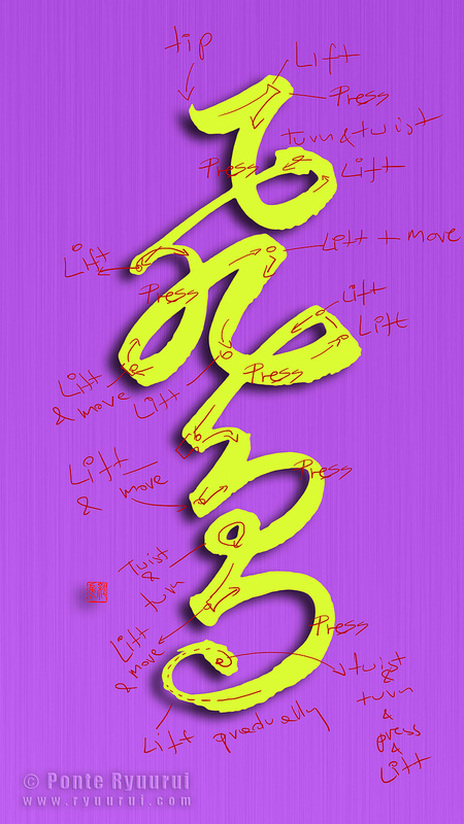 I was writing some calligraphy works for Snow Forest's aroma therapy oil project, and when I created this calligraphy I realised that this is a perfect example for illustrating how does the calligraphy brush tip move during writing.
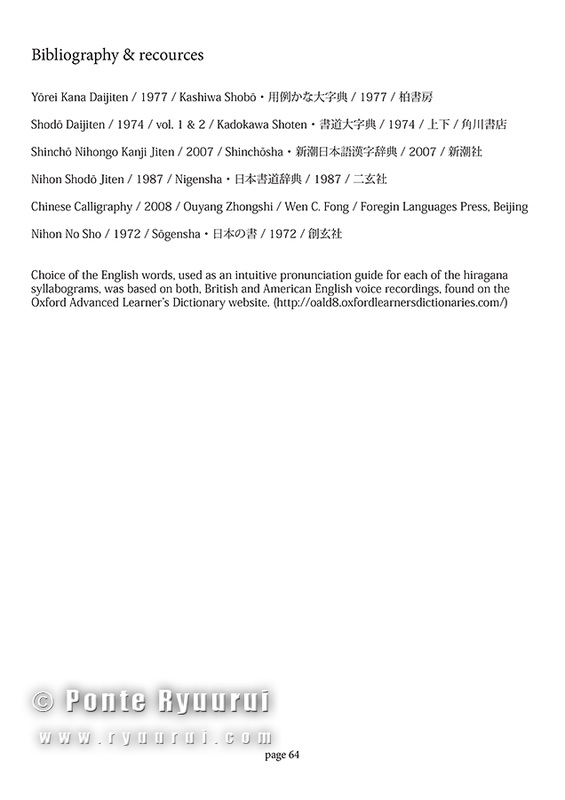
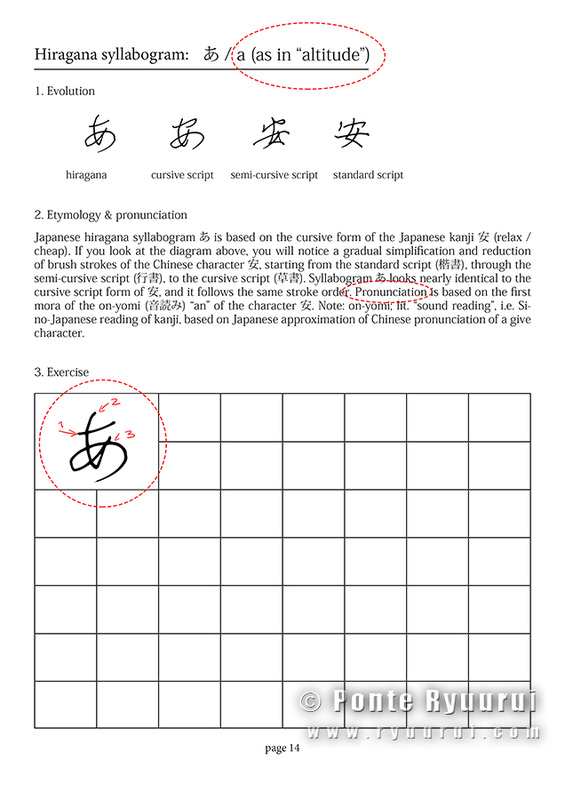
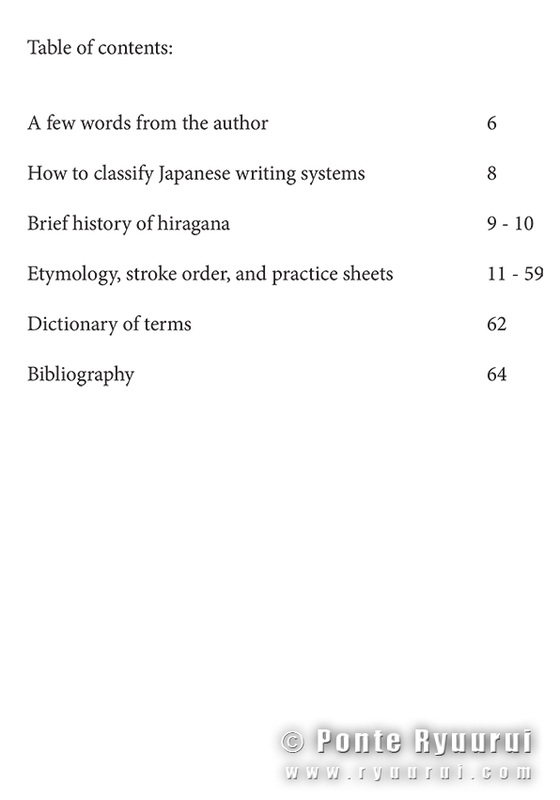
The magic of Chinese calligraphy is based on many factors, but one of the key elements is the mastery of the brush pressure control against the paper surface. This is especially visible in cursive script, which is very dynamic, and the line rapidly changes the direction or thickness. Look at the remarks I made on the pictured single stroke calligraphy work, and note how much is happening from placing the brush on the paper surface to lifting the tip at the end. The brush tip is moving like an elevator, it goes up and down all the time, it also twists and turns, which moves are coordinated with the entire arm, as the wrist barely moves during writing. Those are microscopic movements, but the brush is held at its end of the axis, and the brush tip is at the opposite side. A tiny movement of the calligrapher's arm can cause massive alterations to the brush strokes. Those moves are subconscious, not thought out, and completely intuitive. How does one achieve such coordination? Here is your answer. My teacher was asked once by a student: - Sensei, I cannot write with the hanging arm technique because my hand is shaking too much to which he replied: - It is not your hand that is shaking. Calm your mind, and the hand will follow. That is right. Practice, practice, practice! I found out that writing with the hanging arm technique is improving my skills twice or even three times as fast. Natually, pillow hand and bucket palm, etc. should be taken into consideration during your studies, but hanging arm technique is the bread and butter of calligraphy studies. Do this with a small brush and it will be even more challenging. 間時要有喫緊的心思、忙処要有悠間的趣味 / hanging arm technique, small brush. photo - Mt.Fuji post processed in photoshop 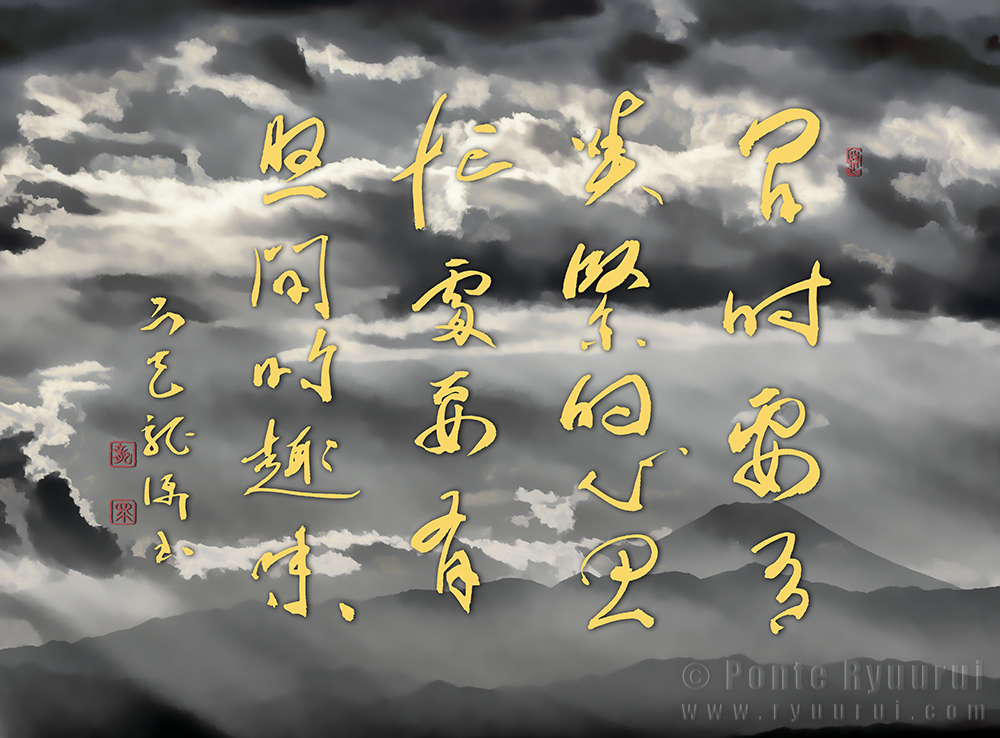 Non-character calligraphy is practiced mostly in China and Japan, though it is a very rare style of Chinese calligraphy. It is of rather modern origin, and it slightly overlaps with the avant-garde calligraphy style. Its basic concept is to prove that the beauty of calligraphy does not have to be tied to the balance and shape of the Chinese characters, but it lives as raw energy in the dynamics of calligraphy brush strokes. Extended studies of Chinese classics, and countless hours spent on writing, allow a calligrapher to utilise his knowledge in such a type of art which is completely disconnected from the language itself, and it proves without a shadow of doubt, that Chinese calligraphy is written with a soul, not the hand. Pictured calligraphy (fragment) has no semantic content. It is a record of a state of mind. 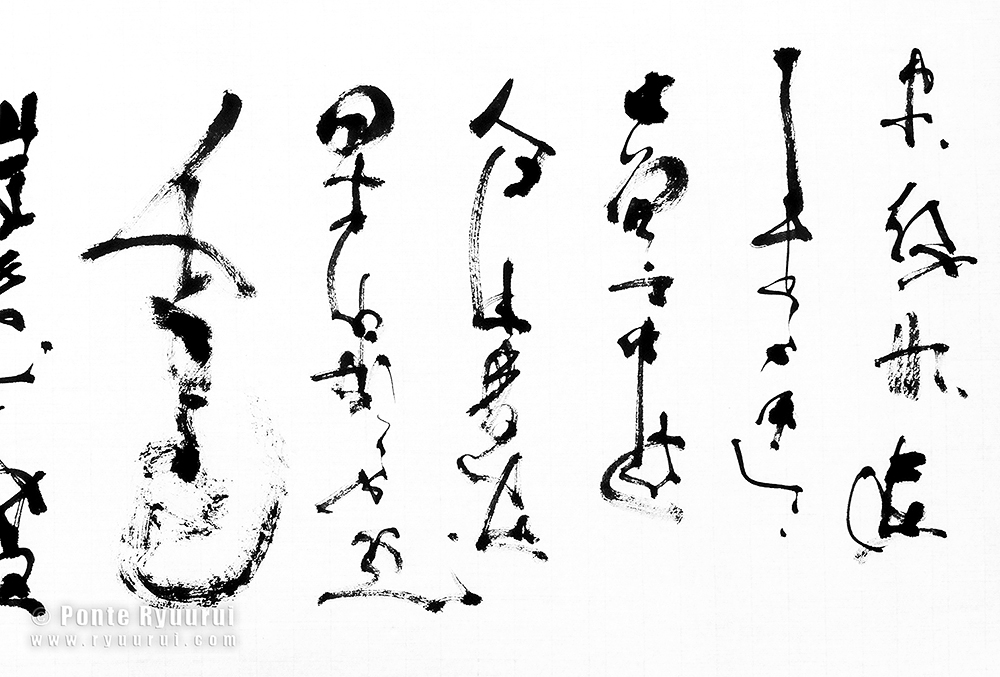 Thi is a continuation of my previous articles on my new book series on Japanese hiragana and katakana. To view previous posts, see here about the book concept in general, and here in regards to the book cover project. Below I am inserting a gallery of 3 images (click any to view). You can see what resources I used for writing the first book on Japanese hiragana. Then there is a sample page, and finally a table of contents page which should shed more light on what can one expect tom find inside. A few words regarding the sample page. Since I published the first draft I received great feedback from you guys, so thank you very much, and I decided to improve a few things. bibliography sample page table of contents I added an intuitive phonetic guide based on Oxford Advanced Learner's Dictionary's British and American English pronunciations of chosen words. This should clear a lot of confusion whenever a tricky pronunciation comes up (such as ゑ / "we"). I also explain where from each of the hiragana syllabograms take their sounds. For example, the hiragana syllabogram つ evolved from the cursive form of kanji 川, but none of the Japanese readings of this character is つ. The book is addresing address all of those issues.
Each hiragana syllabogram will have explained the stroke order and stroke direction, which is crucial for supporting a natural and comfortable way of writing. The diagrams will be large and clear. In table of contents you can see that there will be a general introduction, history of hiragana based on the evolution of Japanese calligraphy in Japan, as those are closely related. I am adding a short write up on the characteristics of the Japanese writing systems, and I define it very clearly what are kanji, what are kana's and what is the difference between them. |
Categories
All
AuthorPonte Ryuurui (品天龍涙) Archives
August 2020
|
 RSS Feed