|
I wanted to do this photoshop manipulation for a long time, just needed a self portrait photo to be able to create it. Last week we were shooting some portraits with my wife and she took the photo you can see at the very bottom of this post. So today I found some time and changed myself into a werewolf. First I thought to composite myself into some horror scene or some dark dungeon, but all werewolf photos are the same, so, I sat down and wrote the calligraphy for it. It read 激情 which means FURY. I recorded the editing and photoshop manipulation so I will post it later on. Enjoy! My Youtube channel with free photoshop tutorials Photography workshops in Tokyo - click for more details. Hire a photographer in Tokyo Buy original Chinese and Japanese calligraphy art 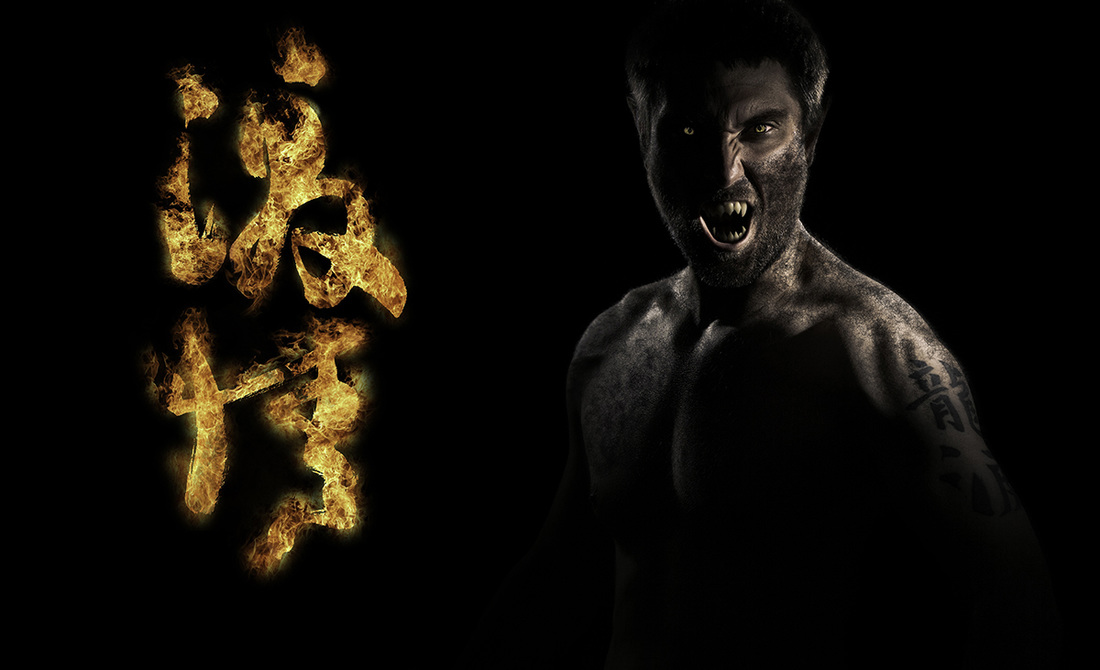 original photo 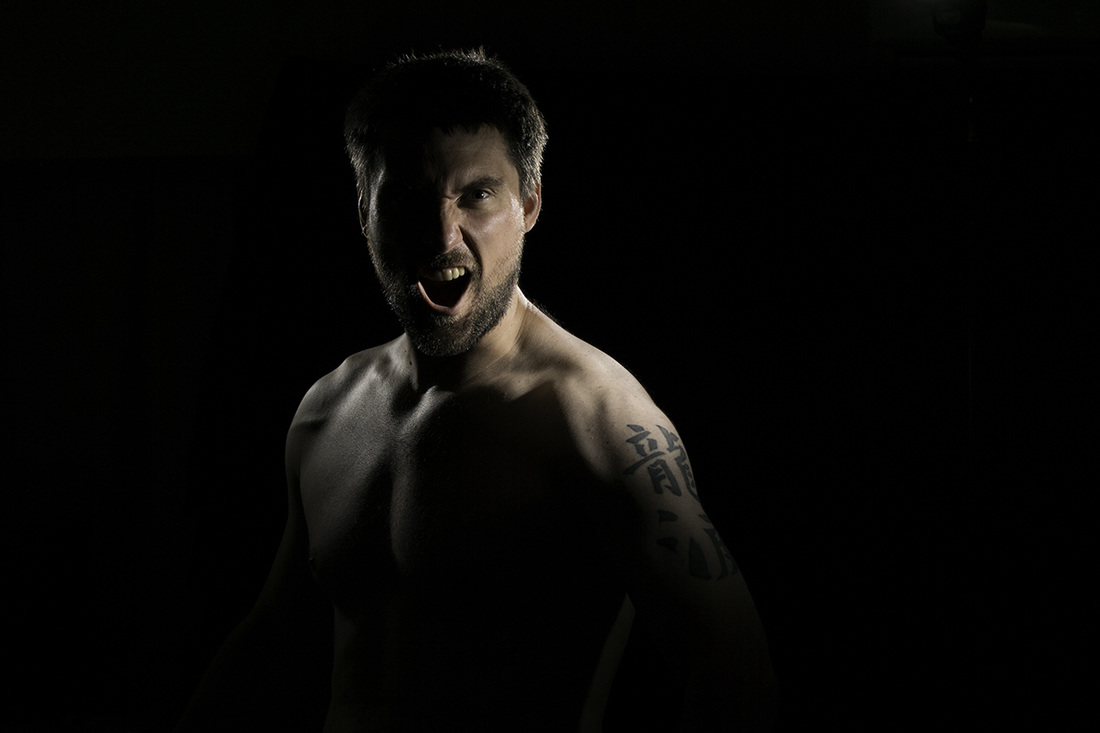 How to create a werewolf in photoshop - speed art Sooooo, we have been shooting fun photos with my wife the other day for photoshop manipulations, and we captured some really cool images. I will be working on my photo later on, I think I will make myself into a werewolf. Anyways, after I was done with editing, I had to think of some catchy phrase. First I wanted to make this into a movie poster, but then I decided to go with a demotivator type of photo. So, if you think you can date feel free to ask my wife out, just make sure you re insured. My Youtube channel with free photoshop tutorials Photography workshops in Tokyo - click for more details. Hire a photographer in Tokyo Buy original Chinese and Japanese calligraphy art 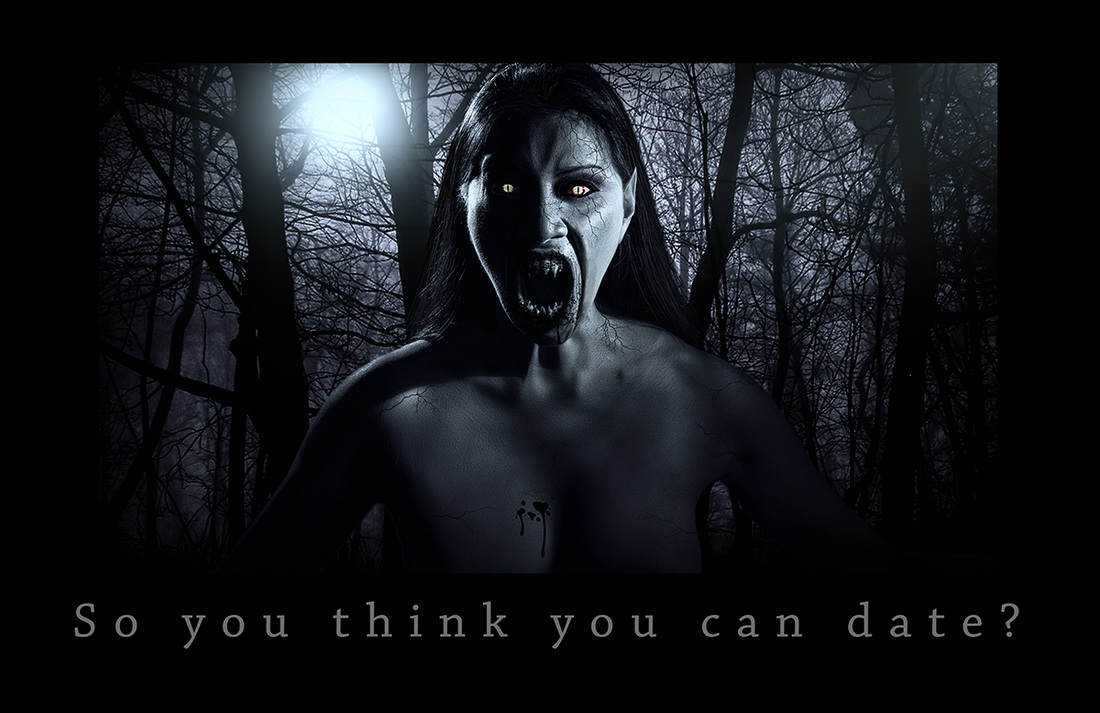 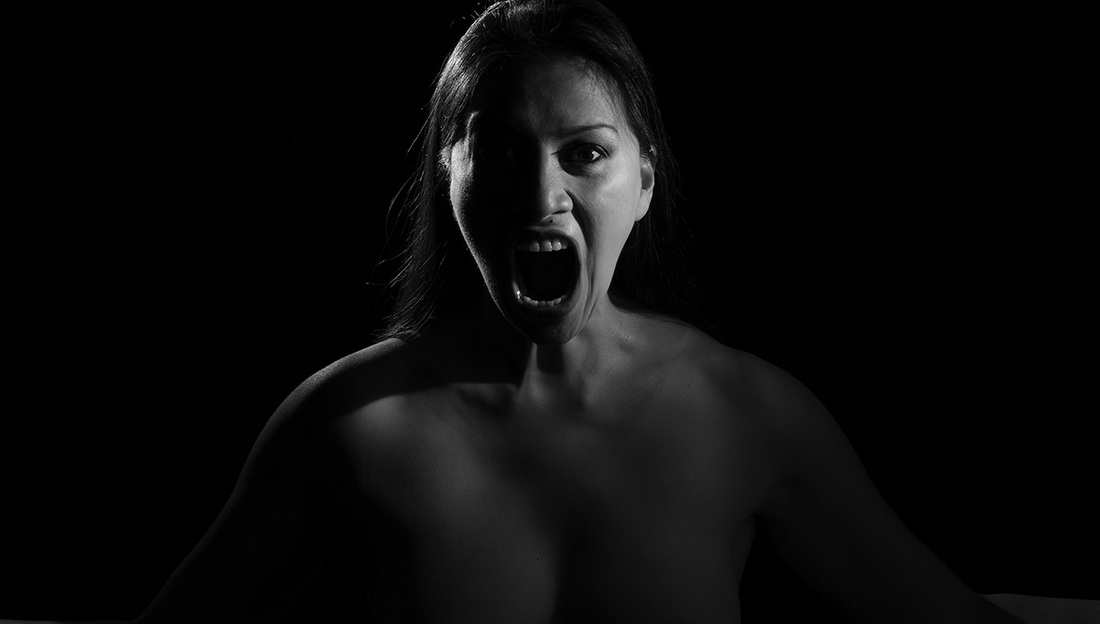 Finally I had some time to play around in photoshop and create some concept art based on my photo of Tokyo. The whole thing is hand painted in photoshop, except a few of those spacecrafts, which I grabbed from Deviant art page stock images. I took this photo some time ago waiting for the hazy sunset near my place, and as usual I took few more photos just in case. I had a few ideas of creating a similar image, and this is an outcome of my today's doodling in photoshop. Photoshop manipulations and composite digital art usually takes a bit of time, this one was not too bad, I think I finished it in 2.5h Anyways, enjoy and more is coming! My Youtube channel with free photoshop tutorials Photography workshops in Tokyo - click for more details. Hire a photographer in Tokyo Buy original Chinese and Japanese calligraphy art 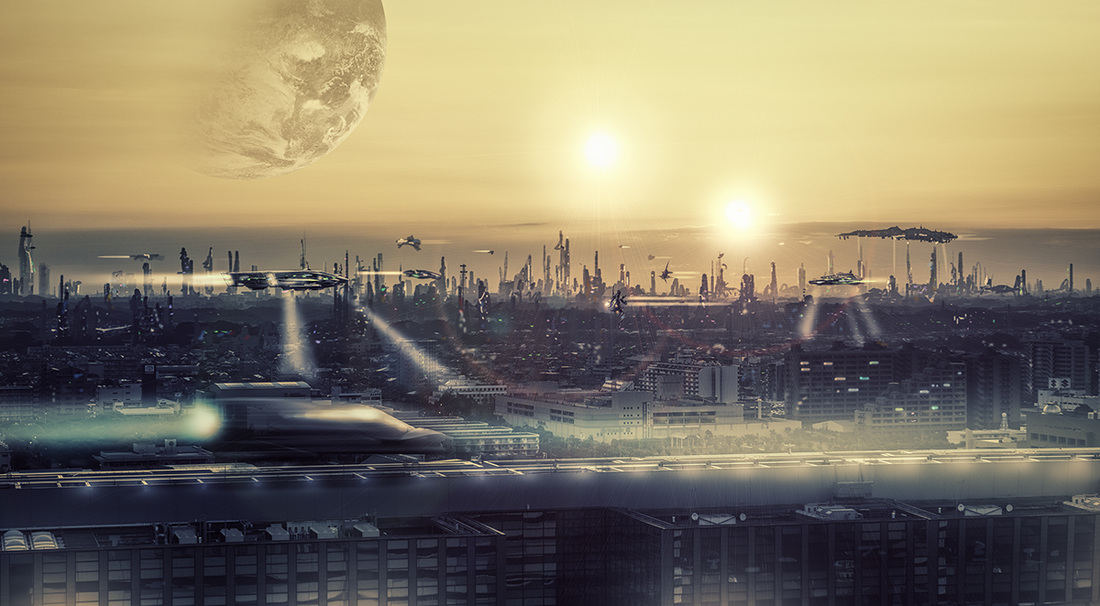 Original image 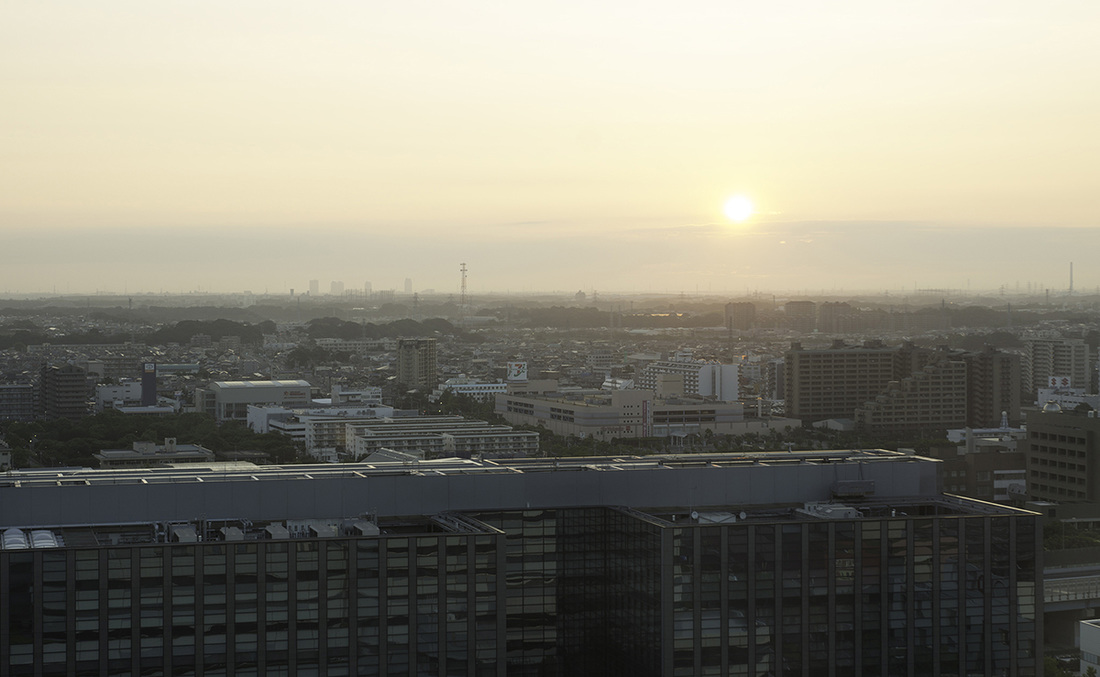 Camera + off camera flash + photoshop = a whole lot of fun! Today I was testing various functions on my new camera and so we went out to a nearby park with my wife to shoot a few pictures. For this photo I used a single flash with a rogue flash honey comb grid. I shot the background once without flash and my wife, and then with her sitting on the ground. The rest of magic happened in photoshop. 1.5 hours later I have a levitating sorceress. My Youtube channel with free photoshop tutorials Buy fine art photo prints at my store on SmugMug. Photography workshops in Tokyo - click for more details. 0 Comments << Previous 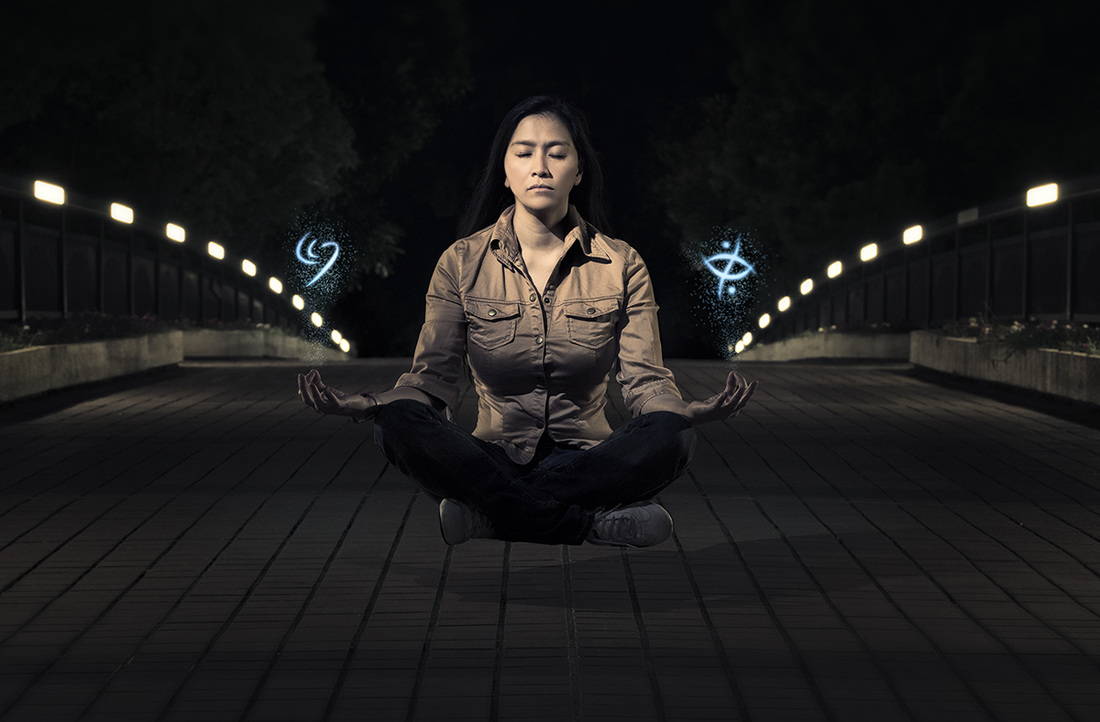
Here is my another photoshop manipulation fun, this time I wanted to keep it simple and the composite is not as complex as the previous one, but I think the message is pretty strong, and that was the intention.Photoshop manipulations can be quite time consuming, but are a lot of fuin and a great way to push further your photoshop skills. I learn more during compositing then during any photo retouching. New techniques, new tricks, etc. Photoshop manipulations are great for learning light, composition and coloring. My Youtube channel with free photoshop tutorials Buy fine art photo prints at my store on SmugMug. Photography workshops in Tokyo - click for more details. Hire a photographer in Tokyo 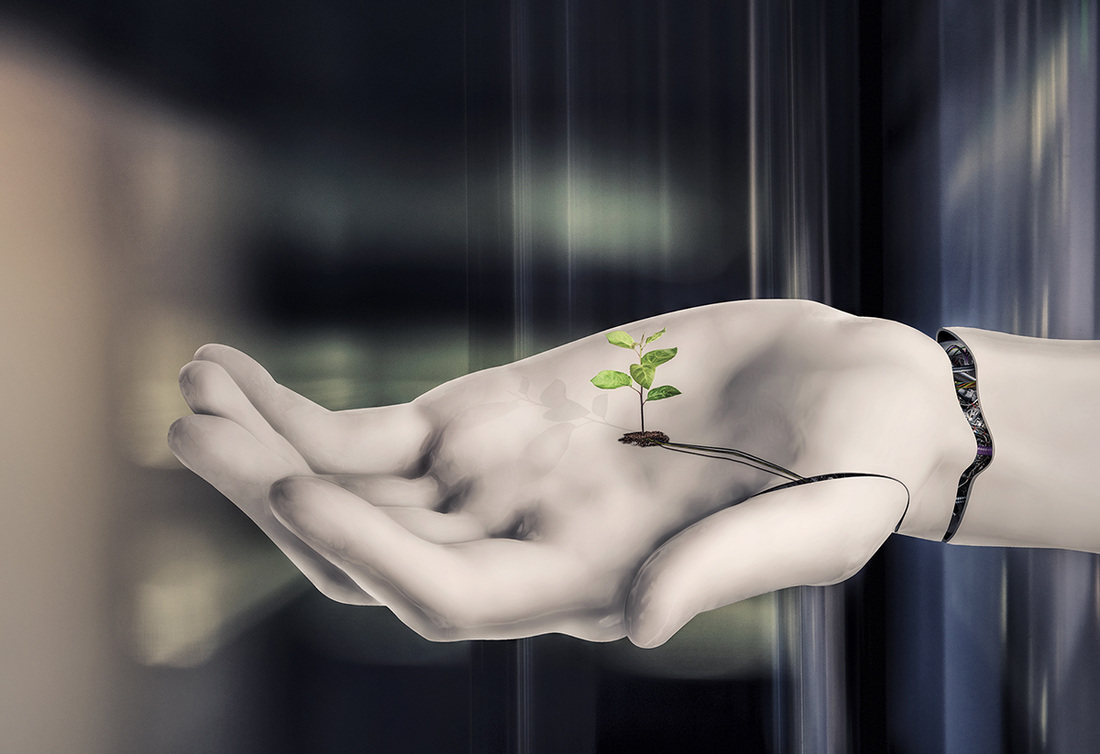
I wrote this Chinese calligraphy some time ago, but I gave it a new look today in photoshop. Both characters are in ancient seal script, which is the oldest script in Chinese calligraphy, and also the most complex one. I gave those characters a slightly modern look, though I realise that it might be difficult to spot for anyone who is not familiar with seal script. Top character is 陽 and the bottom one is 陰, and their meaning is Yang (Sun), and Yin (shadow). Photo editing & Chinese and Japanese calligraphy tutorial videos Buy fine art calligraphy prints at my store in my store on Fina Art Amercia. 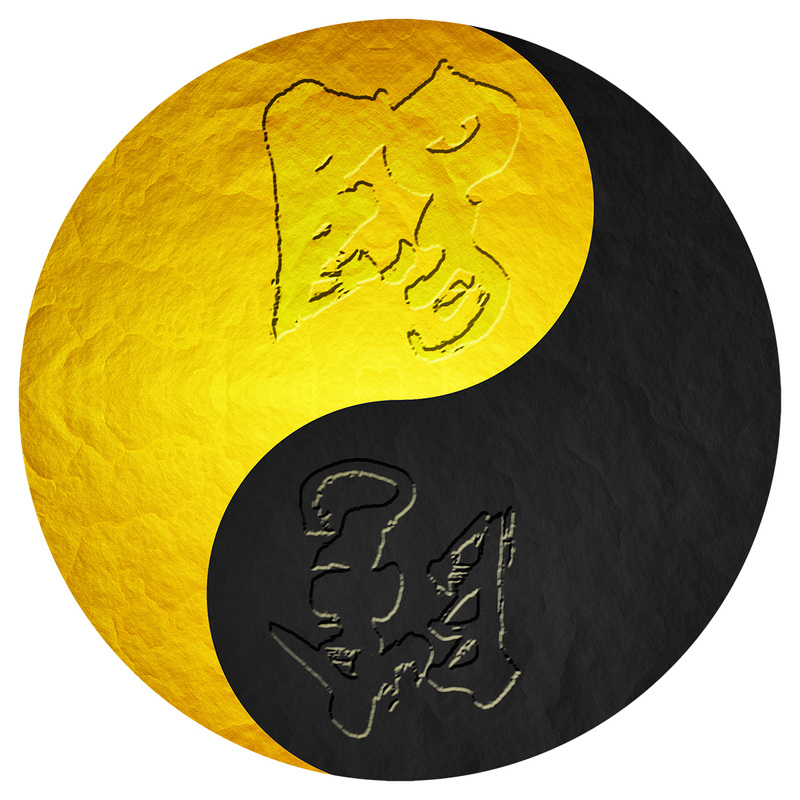
In this photoshop tutorial I will show you how you can easily combine texture of what is in a photograph, with any text. Most of photoshop users knows how to use the text tool, but in this video I will teach you a few cool tricks that will make any added text look really cool. By embedding the very texture of what is in a photo with the shape of the text, new tools and possibilities open and you can use your creativity to personalise any caption that you want to add to the picture. This tutorial is short and not difficult so even if you are a photoshop beginner you should have no problems with following it. My Youtube channel with free photoshop tutorials Buy fine art photo prints at my store on SmugMug. Photography workshops in Tokyo - click for more details. I can be serious for a reasonable amount of time, but then I can help it and I have to dive back into madness. All my life I was wondering why I do not fit any social frames and rules, and once I realised that art is my calling, everything fell into place. We go against what is normal for a reason, it stimulates our imagination and creativity by locking us inside a bubble of emotional intimacy and aloofness. Not many people can understand artists, which is why most of us lead solitary life. The world we create in our minds is so rich and vivid, that we do not even notice what is going on around us. So here it is, another portrait shot by my wife the other day, which I tuned a bit in photoshop to give it a proper punch. And remember, if someone tells you that you are mad, it is either because they are jealous, or because they are too blind too see the true face of sanity. Stay mad as a hat! 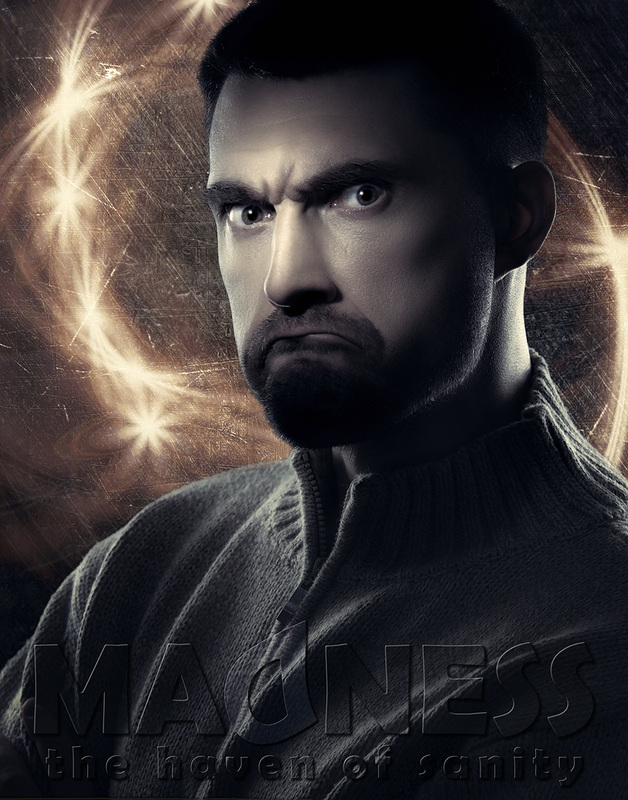
In this photoshop tutorial I will show you how to use channels in order to make very complex selections that would be impossible to accomplish with other photoshop tools, like magic wand, quick select, quick mask, pen tool, or even special plugins, like Topaz ReMask. Each of photoshop selection making tools has its use, and it is good to know which one to use in what circumstances. Channels are perfect for making complicated selections of areas where colour contrast is quite substantial, though there is a way of combining channel selections via calculations menu in photoshop, but this is a subject for next video tutorial. I will use channels to select sky in photoshop, and separate it from the trees, and rooftops. Enjoy! I always wanted to record one of my photoshop manipulations to give you an idea on how it looks like. It is a few hours shrunk into 12 minutes, showing the whole process, from the RAW file to a final image. Photoshop manipulations are a great fun, and also the best way to advance your photo shop skills from good to great. This type of art is also very helpful for any composite photography editing. Finding the balance and harmony between the perspective, light, and colour, is the key to a successful photoshop manipulation. Incidentally, I am launching new service menu - photoshop manipulation and photo retouching. If interested please contact me directly.  For all of you who wish to advance your photoshop and photo retouching skills, I am announcing photoshop workshops in Tokyo. I will create a special menu tab on my website this week, with all the details. For the time being I am offering only private lessons (one to one), either at your place, mine or via internet (online desktop sharing). You can view my photography and photoshop manipulation portfolio here. If interested please feel free to contact me and book your lessons! Left: original photo, that I took yesterday (model: Asuka), and below is a photo manipulation created in photoshop. 
Removal of colour cast or luminosity shift is often necessary, especially when a photo underwent a few steps of editing, and had a few filters, levels, curves, or other changed applied to it. Whether you stack photoshop effects or adding textures to your photo, at some point you will run into an issue that the photo becomes too saturated or too bright, has too much contrast, etc. That is when the technique shown in this photoshop video tutorial comes in handy. It is an easy trick that can be applied to any photo, at any stage between two layers in photoshop, via layer blend modes. I have redone this portrait of Nicole today, added make-up, reshaped the face lines with shadows, and added some skin texture. This is the first time I actually had to increase and amplify skin texture. This was shot in high key, plus the model's skin is insanely smooth, so the skin texture was very shallow. A tricky photo to edit but lots of fun. Also, since the eyes are now more powerful and strong due to make-up, and colour splash, I cropped the photo tighter to make the image even more intense. 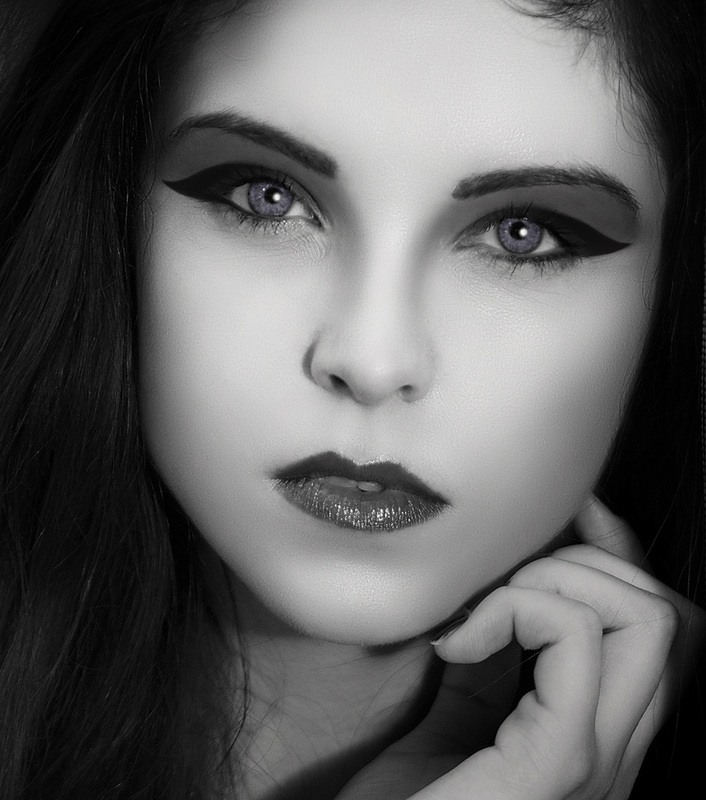 previous version 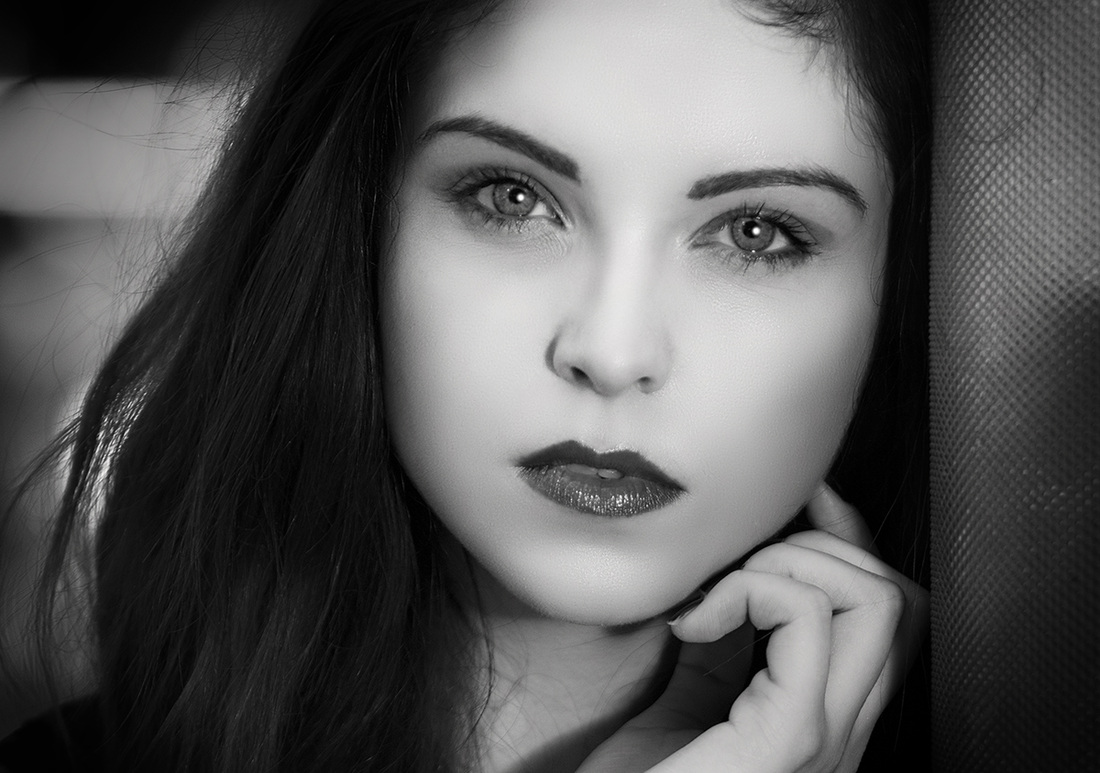 Here is another shot from a photo session with Nicole Rayne, that we had two days ago in Shibuya in central Tokyo. When I captured this frame I knew exactly what I want to do with it - go dark and fantasy theme. I added semi-translucent wings and my calligraphy artwork that I written especially for this image - 闇(の)天使 (Yami no Tenshi), i.e. dark angel). I also went ahead and did a film-like post processing, adding more orange to the skin tones and some blues to the shadows, making it look a bit more cinematic. Hope you guys like it! 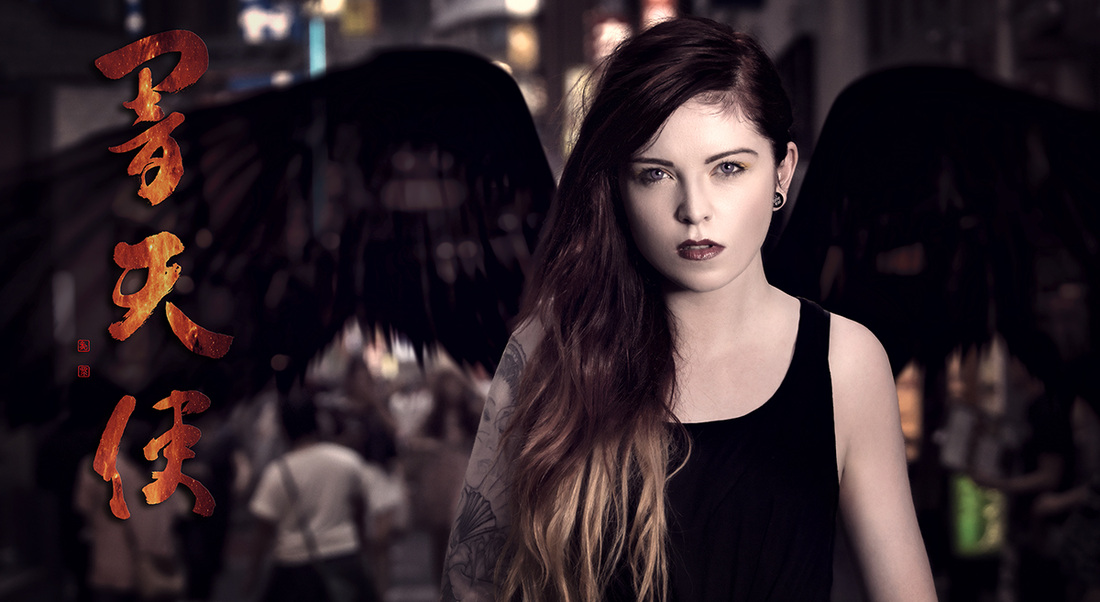
When I import my calligraphy artwork photos into the PC, I cannot help it - I have to play with them in photoshop. It is so much fun. I can tweak them and create a much more strong connection between the meaning of the text, or even a single Chinese character, and its visual and graphic interpretation. It is very addictive, but also a very creative way of adding that final touch to my calligraphy art. Calligraphy in cursive script - 驚 / "amazed". 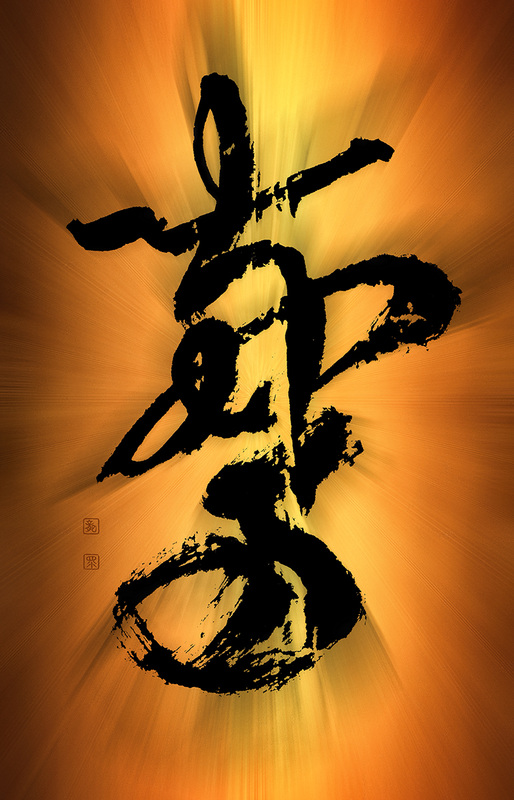
I bet you saw many images online that were shot during daytime and you were puzzled how come the skies are so smooth or water is so silky. Well, that is a trick used by photographers for many many years now, and it is usually achieved by attaching an ND (neutral density) filter to the lens. ND filter is nothing more but a piece of glass that reduces the amount of light that travels through the lens onto the sensor, which allows for slowing down the shutter speed. However, even though using ND filter gives probably the best and most natural looking results, you can fake that effect in photoshop, and it is not difficult at all! Watch this video tutorial to find out how it is done. For more photoshop tutorials visit my Youtube channel. Here is my next composite photo manipulation created from a boudoir shot of a Japanese model Asuka that I shot last week. If you want to learn more about composite photography, see this article and video tutorial here. Composite photography can be lots of fun so if you have photoshop, go ahead and have some photo manipulation fun. It is a great way to learn composition, light, colour management, and photoshop tools. 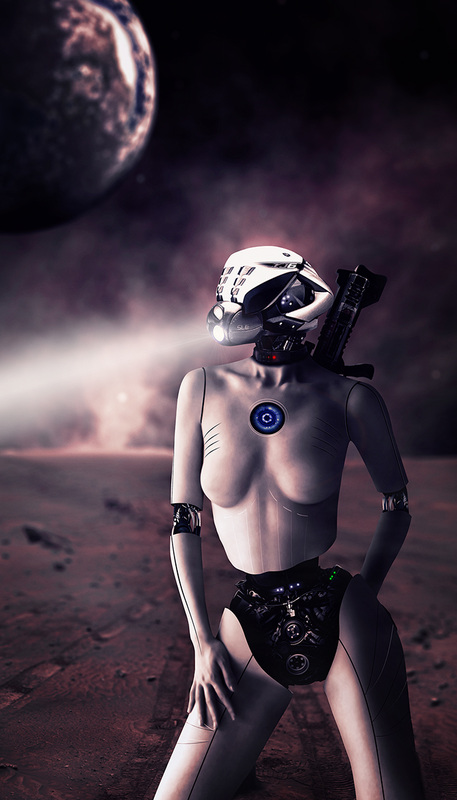
Composite photography is one of the most creative types of this amazing visual art. It allows for manipulating not just one photo but putting many photos together. It is a great way not only to learn composition of a photo, developing one's artistic skills, but also mastery of the photoshop tools. In this tutorial I am using a background photo and another complex composite shot of a Japanese model, which I converted into a cyborg or an android sci fi vision. Just so you know, both photos were shot by me in Tokyo, so this makes it even more cybertron-like. Anyways, I hope that this tutorial will help you guys with creating better composite images. Pixelation and pixel bending can be quite annoying and ruin visually the most amazing photos. Issues with pixels appear either when the editing was pushed far enough to damage pixels, or tonal transitions in the photo range from very dark to very bright tones, and vice versa. There are a few ways of dealing with pixelations, and I discuss all the methods that I use in this video tutorial. I show there a few tricks that you can easily apply in photoshop during post processing, or even saving the final file. I also talk about DeNoise plugin from Topaz Labs, which is a phenomenal piece of software, and I use it for noise reduction and dealing with pixelation and pixel bending. For more photoshop tutorials and photo editing tips and tricks, please visit my YouTube channel. Here is my new photoshop manipulation based on a photo of a Japanese model Asuka that I took recently. For those of you who do not know what a photo manipulation or a photo composite is I offer a short explanation. A photo composite is a photo that is composed out of few images, and photo manipulation refers to a photo that was altered digitally in post processing software, such as photoshop. The photo you see here is a combination of the two, where the main photo is the shot of the model holding a phone, and then I added the background, all the skin surface alterations, helmet and the pipes, the hologram, and I finished with lights, shadows and colour blending. Photo manipulations and photo composites are usually time consuming, and require lots of patience, but are a great fun for anyone who enjoys creating. 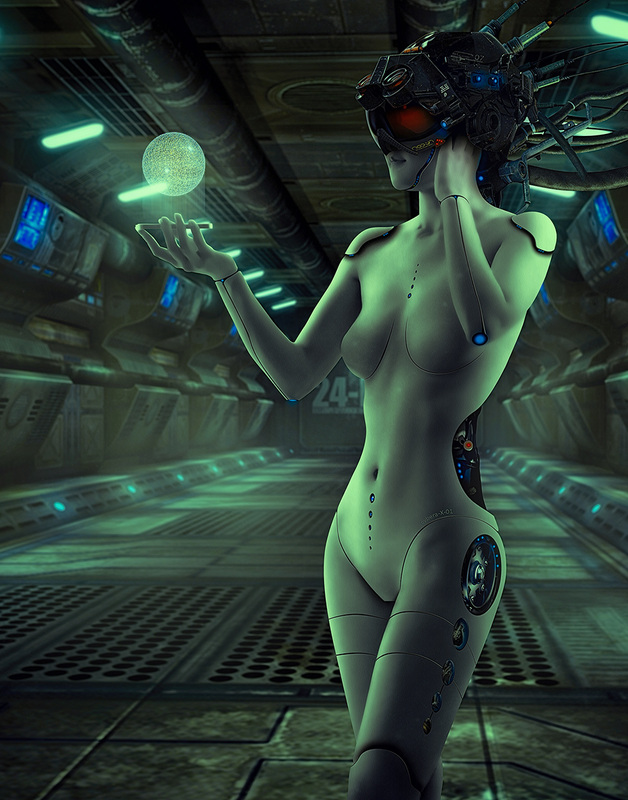
I had lots of fun with this photo. It was a tricky shot to take, as the background was very bright (morning sun at a steep angle), but the main subject was back of the model covered in Chinese characters. I also wanted to utilise those beautiful delicate shadows that sculpted the body form. I added some flares and bokeh`ed lights to make it more dreamy, and lazy-early-morning-like. Model: Asuka. Girls in Tokyo area interested in boudoir or Chinese calligraphy body art photo shoot, please contact me for details. 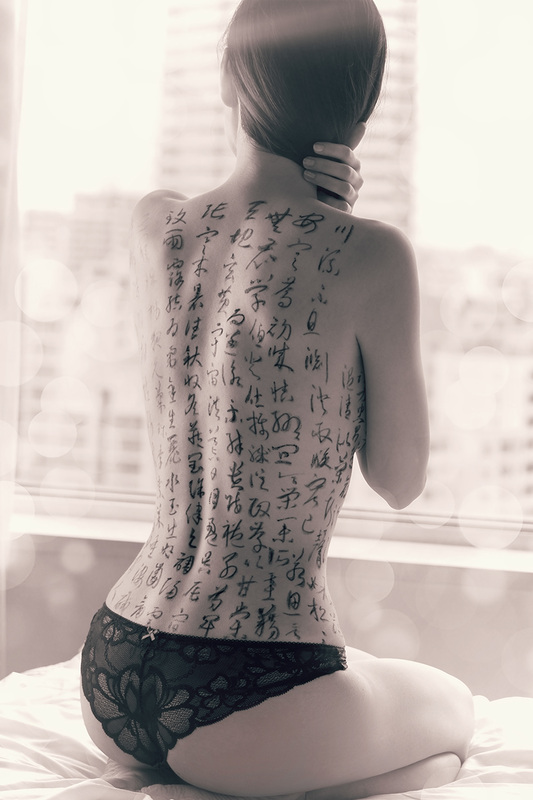
Three methods of dodging and burning in photoshop that I find to be the most effective ones6/15/2014 In this next photoshop tutorial I am talking about three different dodging and burning techniques that I use whenever I retouch my photos. I discuss the dodge and burn too which is a built-in function of photoshop, also the doging and burning via applying curves layers, and lastly, frequency separation based dodging and burning. Dodging and burning is a crucial step in every photo retouching, yet often overlooked. It really gives the photo the refined and polished look, and it is one of those photo retouching techniques that should be learned. I am creating 2 photoshop tutorials per week. If anyone has a question regarding any of my tutorials, or wishes me to discuss any particular photoshop technique, please feel free to leave a comment under this post, or contact me at ponte@ryuurui.com I have finished my next android photoshop manipulation. I just love making those. I think I need to start hunting for models just for my new cyborg ideas? Girls in Tokyo area - please contact me if interested. Talking about cyborgs, I would like to recommend you guys a website created by Mpaolo Almeida, a photoshop artist from Brazil. This guys is really talented and has amazing ideas for his photo manipulations. On top of this he is a really down to earth guy. Have a look at his site, www.tutoriaisphotoshop.info, and his youtube channel. He is also selling tutorials on various types of photo manipulation, including cyborgs, steampunk, fantasy and dark art. Although the tuts are in Portuguese, his photoshop is in English, and it is quite easy to follow his moves, as long as you know photoshop at least to a certain degree. Mpaolo speak English, so you can look him up on FB and ask about the tutorials. I actually have a few of them myself, and they are really very very helpful indeed. 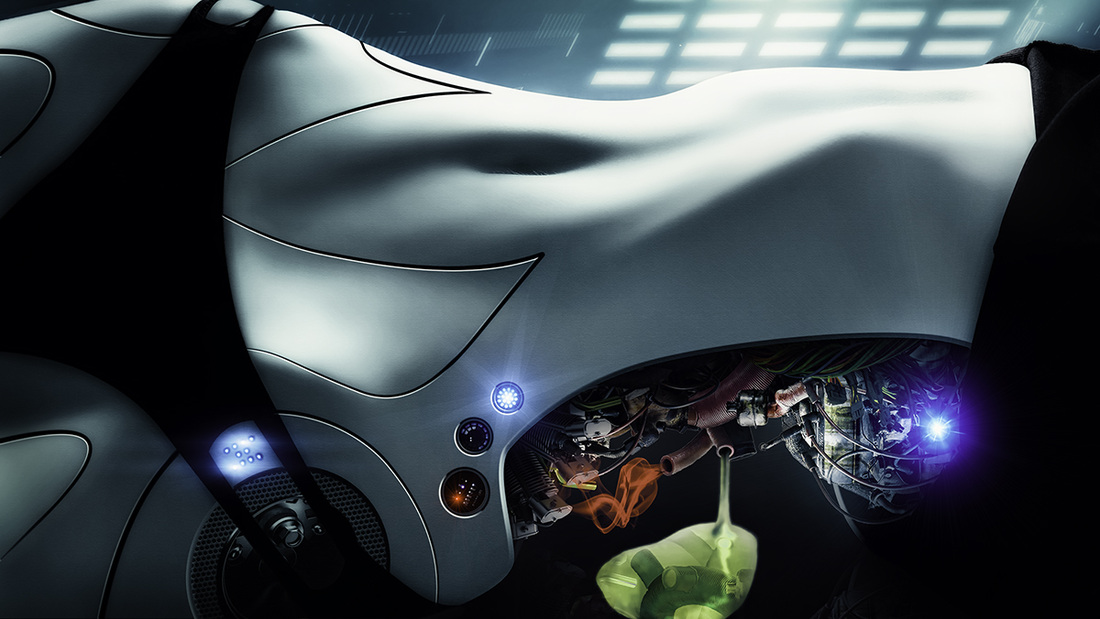 Here is another photoshop tutorial in which I will discuss the issue of composition in photography and its importance. I am talking a bit about the rule of thirds, and general idea of how to compose a photo, based on one of my own captures. I am also explaining how to deal with composition issues in photoshop through blending layers, ands using tools such as "blend if", layer masking, etc. For more video tutorials on photoshop please subscribe to my YouTube channel. My new photo manipulation of a sexy female android. I LOVE converting girls into androids and cyborgs, I have no idea why, perhaps I play too many PC games, or perhaps it is because they look jam hot. It is the subtle feminine vibe in symbiosis with a motherboard driven half-synthetic life form. It really fascinates me. This photoshop manipulation took me a few hours to finish, I was trying many different things and ideas. I used photoshop for most of the editing, and then topaz restyle plugin at the end. You can check out my previous photoshop cyborg manipulation here. Model Eccaia 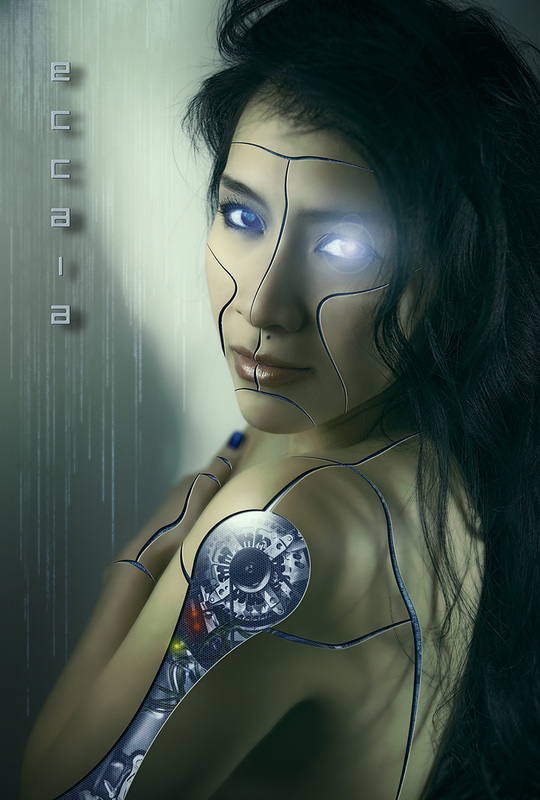
|
Categories
All
AuthorPonte Ryuurui (品天龍涙) Archives
August 2020
|
 RSS Feed