|
Take care of the small things and the rest will fall into place. Shadows are one of those "small " things. To tell the truth shadows are everything when it comes to photoshop manipulation. In one of my previouis articles titled " How to start with photoshop manipulation and composite photography " I have mentioned the most important elements of composite photography but I think that shadows are so important they just deserve a separate article. In any photoshop manipulation that is a collage of few photographs or 3D models, etc. you will have to deal with perspective, lighting and colors. Now, perspective and color matching are extremely important, but if you do not get the shadows right things will look completely off. You can still get away with mismatched perspective and colors, but if you mess up the shadows then your photoshop manipulation will look fake. And by shadows I also mean the lighting, because there is no shadow without light. You simply cannot separate those two. Shadows are complex and the more light sources you have the more taxing your job will be to have those shadows being cast correctly. You have to match the light direction on all the pieces of the photoshop manipulation puzzle, i.e. all images have to be lit from the same angle and with similar strength and color, but then if you decide to add your own light sources you will need to take that into consideration. The best way to do it is to build around your subject or model. Some people like to start with the background, mostly those who are not using their own model images. If I create a photoshop manipulation with a person in the photo then I always use my own images. I know how I lit them, what lens I used, what perspective I shot from, etc. But it does not really make things any easier, the only advantage is that I can work on RAW files and get as much info out of them as possible, but I still need to create my own shadows. When you create shadows in photoshop pay attention to light direction, light strength, number of light sources and the light ratio between them (which one is the key light, which one is a back light, etc.), angle of light (low angle light will cast longer shadows, just like a sunset or sunrise). you also need to consider how shadows affect the textures (textures are less visible when in shadows), color temperature (shadows are colder, so often have blue-ish cast), then there is length of the shadows and their definition, so you will have stronger shadows near anything that casts them and they will dissipate the farther they cast. Shadows have shapes and if they are cast over other things in the image, they will wrap around them and become deformed. Stand near a wall and place a light behind you and you will know what I mean; the shadow on the floor will be different than on the wall. Warp, puppet warp, distort and skew will be most helpful tools there. Last tip that I will give you is extremely important. Build shadows in layers. Do not try to do it in one go, it won't work. Just like with skin editing, or any type of photo retouching for that matter, the more detailed and patient you are the better results it will yield you.
Contact me directly for one-to-one online photoshop tutorials via desktop sharing. Portrait photography service, Tokyo - website http://www.portrait-photography-tokyo.com/ Photography workshops in Tokyo: http://www.ryuurui.com/photography-workshops.html Hire a photographer in Tokyo: http://www.ryuurui.com/hire-a-photographer-in-tokyo.html Photo blog: http://www.japan-in-photography.com/ Facebook: https://www.facebook.com/ponteryuurui Twitter: https://twitter.com/PonteRyuurui Google+: https://plus.google.com/u/0/+PonteRyuurui/posts For more tutorials and how to videos check out my photoshop and photography tips and tricks YouTube channel: https://www.youtube.com/channel/UCEOVGZ2rpLhR7gSPvaexxxQ How to edit rough skin pores and mattify shiny skin in photoshop (detailed video tutorial)12/3/2015 In this photoshop tutorial I will show you how you can easily edit rough and bumpy skin pores and mattify shiny and reflective skin patches in photoshop. I am using two techniques: micro dodging and frequency separation. Both are used in professional portrait retouching and are really useful tools for editing not just portraits but other types of photography as well. I use them on a daily basis and although micro dodging can be time consuming if you want to do a really good job, but trust me, there is no better and more accurate method. If you are serious about your photography and wish to handle top notch magazine quality photos to your clients or add them to your portfolio, then both techniques are definitely something you should learn. Micro dodging allows for lessening the difference between dark tones and bright tones in the image, which helps to make skin appear healthy and smooth. Frequency separation allows for splitting tones and textures into separate layers which is essential if you want to keep the quality of tones and textures in your photo. Both techniques require photoshop or any program that allows for working on layers. This is why photoshop is vastly superior to lightroom. In this video tutorial I am explaining frequency separation and micro dodging in details, so you should be able to try both on your own photos without any issues. Happy editing! Anyone interested in private photoshop workshops via skype desktop sharing please contact me directly. My Youtube channel with free photoshop tutorials Photography workshops in Tokyo - click for more details. Hire a photographer in Tokyo Buy original Chinese and Japanese calligraphy art Check out my new portrait photography services in Tokyo website! This video tutorial is for lazy people like myself who cannot be bothered reading. I wrote an article on my other page, Portrait Photography Tokyo, that gives tips on how to crop photos in photoshop and you can read it here, though this video is probably covering it in greater depth. Cropping is nothing else but an attempt at fine tuning composition. If you shoot on a tripod, your composition should be spot on, but if you shoot quick and hand held things may get a bit misaligned. I create many composite images and photoshop manipulations so for me cropping is a second nature. Cropping is a fantastic exercise for improving your composition, and composition is one of the most important things in photography, or any type of art really. So take your time, bring some photos into photoshop and try different ways of cropping one image, you may be surprised what you can learn. In this video I am taking one image and showing you a few ways of cropping it, and explain in details why I cropped it this way or another, which brings you behind the scenes and lets you understand my thought flow. You can apply anything from this photoshop tutorial to your photography when you are out and shooting. Enjoy! Anyone interested in private photoshop workshops via skype desktop sharing please contact me directly. If you are looking for a portrait photographer in Tokyo, check out my services menu tab. My Youtube channel with free photoshop tutorials Photography workshops in Tokyo - click for more details. Hire a photographer in Tokyo Buy original Chinese and Japanese calligraphy art Check out my new portrait photography services in Tokyo website! How to start with photoshop #5 - layers & masks (photoshop tutorial series for beginners)11/15/2015 In this episode of free photoshop tutorials for beginners I will help you to understand layers and masks and how to use them in practice. The whole series is designed for photographers who either want to improve photoshop skills, or those of you who made the right decision of moving from Lightroom to Photoshop to do some proper photo editing. Photoshop layers and masks is what makes photoshop such a unique tool and what places it high above the abilities of Lightoroom. You can work non-destructively on your photos by stacking various effects as adjustment layers, on top of it you can fine tune those adjustments via blending, opacity and masks. Blending modes and opacity / fill are used for executing global shifts between layers, and masks are there for targeting certain areas of your image that you wish to fix or enhance. By the end of this video you will have a solid grasp on the basics of layers and masks and be aware of its massive potential. If you would prefer private photoshop workshops via skype desktop sharing then contact me directly. My Youtube channel with free photoshop tutorials Photography workshops in Tokyo - click for more details. Hire a photographer in Tokyo Buy original Chinese and Japanese calligraphy art Check out my new portrait photography services in Tokyo website! In this next photoshop tutorial for beginners I explain how to use vector tools on practical examples of photos. The most complex tool here is the pen tool, and it is also the most useful one. I coud not live without pen tool, it is an absolute life saver in editing of virtually any type of photos, but it is essential for making very precise selections in images portraying architecture, where there are many straight or curved lines and other selection tools simply fail. Pen tool is also amazing for editing portraiture and selecting body outline, or parts of the face, like eyes, lips, etc. I have a separate video on how to use pen tool in photoshop here. This part 4 of the photoshop tutorial series for photographers covers other tools such as color palette, pan tool, quick mask tool, and zoom tool. In next episode I will be discussing the basics of working with layers and masks, which lays at the very essence of photoshop workflow. If you would prefer private photoshop workshops via skype desktop sharing then contact me directly. My Youtube channel with free photoshop tutorials Photography workshops in Tokyo - click for more details. Hire a photographer in Tokyo Buy original Chinese and Japanese calligraphy art Check out my new portrait photography services in Tokyo website! Here is the third episode of photoshop tutorial for beginners that is aimed at photographers and explains basic photoshop tools and functions from a practical point of view based on actual photos. The idea is to help anyone who is getting started with photoshop and make this program appear a bit less intimidating. In this episode I am discussing the editing tools, which are: healing brushes, brush tools, clone stamp tools, history brushes, eraser, gradient tool, blur, sharpen and smudge tools, and lastly dodge, burn and sponge tools. This video is not meant to be in-depth tutorial on each of those tools, rather than a practical introduction that offers enough information for performing photo editing. Some of photoshop tools are more complex and some are more used than others so I will be creating separate videos on photoshop tools that I use the most in my day-to-day photoshop work. Next episode will cover vector tools and what I call complimentary tools, and then I will discuss how to work on layers and what are the most practical examples of using layer masks, then I will focus on editing an image from start to finish, and also show you how powerful is Adobe Camera RAW. If you would prefer private photoshop workshops via skype desktop sharing then contact me directly. My Youtube channel with free photoshop tutorials Photography workshops in Tokyo - click for more details. Hire a photographer in Tokyo Buy original Chinese and Japanese calligraphy art Check out my new portrait photography services in Tokyo website! Private photoshop workshops via skype - photo editing, composite photography and photo manipulation11/1/2015 If you know how to take photos, now it is time to learn how to edit them properly. If you want to learn how to give your photos a unique look and fine polished magazine quality finish, then contact me and I will design workshops according to your level and needs. My focus is portrait and architecture, as well as composites and photoshop manipualtions. I teach via desktop sharing so you can see what I do on my screen in real time, stop me or ask questions at any moment. All levels of photoshop users are welcome. See this link for more details, Click here to view below image in non-compressed version in full HD model: Lena
How to start with photoshop #2 - selection tools (photoshop tutorial series for beginners)10/22/2015 Selection tools are very important and useful for almost any photo editing. Starting with simple and basic selections made with a rectangular marquee tool through a bit more complex magnetic lasso tool to an advanced options such as pen tool or channel based selections, selection tools are a bread and butter of my daily work in photoshop, regardless whether I am editing an image or working on a complex photoshop manipulation. This video is aimed at beginners and it is a second in the series. I talk about selection tools and cover all necessary functions needed for basic retouching. More advanced videos will follow, including separate chapters for channels, pen tool, and more complex functions of basic selection tools, such as perspective warp, which was introduced in photoshop CS6. There are many videos onlien regarding photoshop, but I know how difficult is to find one ways around when you open the photoshop for the first time. I hope this series will make it easier for you. Stay tuned for upcoming videos in the beginners series. In new episodes I will be explaining how to use editing tools, vector tools, remaining tools, how to work on layers, and there also will be a separate video on adobe camera RAW basic functions. For more free photoshop tutorials feel free to view my YouTube channel. My Youtube channel with free photoshop tutorials Photography workshops in Tokyo - click for more details. Hire a photographer in Tokyo Buy original Chinese and Japanese calligraphy art Check out my new portrait photography services in Tokyo website! How to start with photoshop #1 - photoshop interface (photoshop tutorial series for beginners)10/15/2015 This new series of photoshop tutorials for beginners will cover all aspects of photoshop from practical point of view. I already created a video on how to tweak various PC and photoshop settings to improve performance of photoshop and speed up photo editing workflow. Today I have released first video of the series that should help anyone who is new to photoshop. In this video I cover the entire interface, explain photoshop menus, show you how you can set up your own personalized working space and save it as a default, and explain how various panels and menus interact with one another. In upcoming video tutorials I will teach you all the tools and menu options in depth, based on practical examples so it is much easier to learn and understand. Photoshop tools and menus are not that difficult to learn, the whole trick is in knowing how to use all those tools together to achieve the result you want. I am sure you will have solid knowledge base at the end of the series. Any suggestions / ideas - please let me know. My Youtube channel with free photoshop tutorials Photography workshops in Tokyo - click for more details. Hire a photographer in Tokyo Buy original Chinese and Japanese calligraphy art Check out my new portrait photography services in Tokyo website! There are two ways that you can improve performance of your photoshop. One is via upgrading and tweaking your PC hardware, and the other is through software settings of your OS, photoshop, and other related programs. In terms of hardware, the key PC components that may have an impact on the performance of photoshop are the amount of RAM, number of CPU cores and their speed, VRAM of your graphics card, type of hard drives you are using (HDD vs. SSD, and monitor size / type. In terms of software, one has to consider OS version, anti virus programs, hardware settings and their drivers, photoshop updates, photoshop plugin updates, how many programs are running in the background, and numerous settings that have to be performed inside photoshop. To learn more about how you can improve the performance of your photoshop, watch the video linked below, in which I go through all those items in depth. My Youtube channel with free photoshop tutorials Photography workshops in Tokyo - click for more details. Hire a photographer in Tokyo Buy original Chinese and Japanese calligraphy art Check out my new portrait photography services in Tokyo website!  When I was younger I hated school with passion. Not because I do not like to learn, quite the contrary, simply school was too intellectually confined, lacking finesse, and rather dull. I teach photography art the same way as I would like to have learned when I was a kid. I teach not what I know but whatever is that interest you, bearing in mind your current level and skill. I also teach with the vision of post processing and image retouching, as I believe that post processing is equally, if not more important than taking photos, and I really mean that. The technical side of photography, like setting proper ISO, shutter speed and aperture is not that complicated, and sooner or later you will pick it up naturally with practice. Photography is an art, not a geek show. Leave the technicalities to those who cannot see a bigger picture. The most essential thing to master in photography is understanding the light (with the exception of portrait photography, in which case you also need to understand human psychology, to be able to evoke or comprehend their body language and reactions). You have to fall in love with light, learn how to adjust to it or control it. Light determines compositions, both during night and day. Photography does not exist without light, and good photography does not exist without understanding of how to capture it. I put a huge stress on composition, not in a technical sense, I rather emphasize the artistic feel of composition and how to sense balance in the image. I teach how to find a photograph in a mess of nothingness, a scene that is loud and convoluted, how to appreciate art in what you thought was mundane, how to see and compose with energy and aura of a scene, rather than place items on the crossing lines of rule of thirds, because the book or article told you to do so. In addition, I also teach post processing and advanced photoshop manipulation online via desktop sharing, so once you return home with your images that you took in Tokyo or any other place, we can continue the education through the internet. My experience and scope as an artist goes far beyond photography, which allows me to see a much bigger picture. I do not just teach photography, I teach art. Contact me for details here. Available photography workshops: portrait photography, street photography, architecture photography and night photography. My Youtube channel with free photoshop tutorials Photography workshops in Tokyo - click for more details. Hire a photographer in Tokyo Buy original Chinese and Japanese calligraphy art Check out my new portrait photography website! It is possible that computers and robotics will kill us all off at some point but I plan to have as much fun with technology as possible until it happens. It is all down to learning the tools and how to use them in conjunction with one another, and it can be overwhelming in case of programs like photoshop, but it can be learned, and once you do you just down want to go back (if you are interested in learning photoshop, photo editing or photo manipulation - contact me directly and we can discuss private workshops). The same as it happened with cameras, when the digital ones phased out the film cameras. I know that film is still in use, but in all honesty, why bother. Digital is far more fun, clean and does not honk. Digital art and the literally endless creative possibilities it offers is all too good to pass on. I am already working on merging 2D with 3D and going completely mental with my sci fi projects. Girls interested in a photo shoot - currently looking for female models in Tokyo area interested in cyber sci fi art, Japanese calligraphy body art, or portrait shots. I am always looking for new faces and bodies so e-mail me in interested. My Youtube channel with free photoshop tutorials Photography workshops in Tokyo - click for more details. Hire a photographer in Tokyo Buy original Chinese and Japanese calligraphy art Check out my new portrait photography website! Sci fi sexy cyborg girl photoshop manipulation speed art video
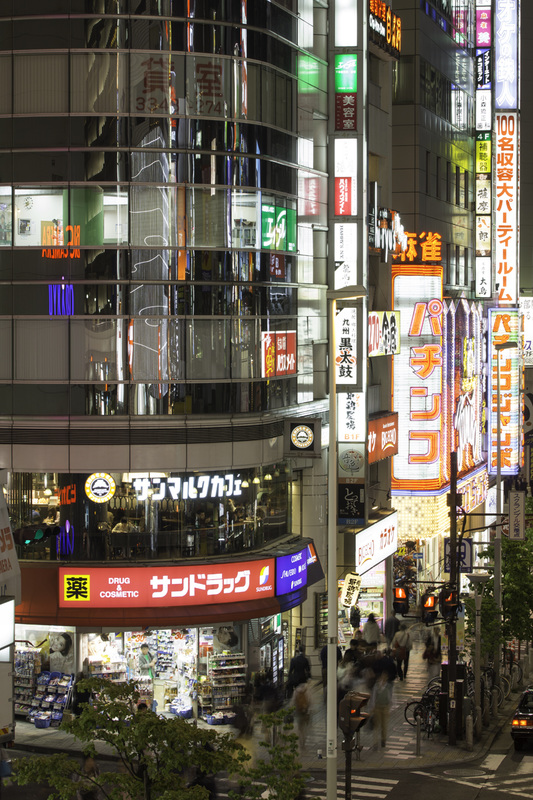
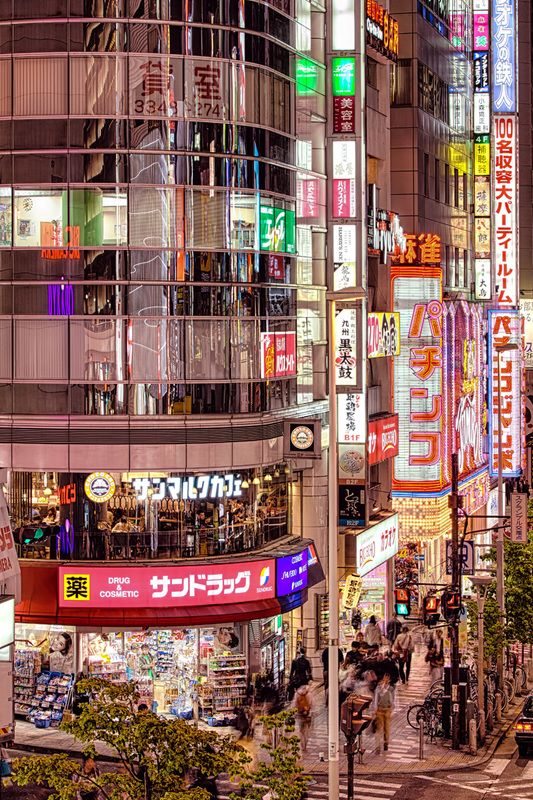
HDR stands for High Dynamic Range and in photography it usually refers to a scene that has a massive differences between the dark and bright tones. Unlike a human eye, most of the digital cameras, or any cameras, cannot capture extreme dynamic range scenes, though the technology is drastically improving (Alpha Sony 7s comes to mind). So if you cannot dish tens of thousands of dollars for a medium format camera, then HDR editing software is the way to go, or at least it was for me. I used to work with Photomatix and HDR efex PRO 2 from Google software, but to be honest I never was fully satisfied with the results. The process is mostly automated and relatively fast, even if you will make final adjustments in photoshop, but when I started to manually blend layers in photoshop, my photos are clean, artifact free, without any crazy micro contrast or fake looking pale washed out colors (mainly red). Below is a short video that I made today, I am revising some of my older photos and I re-edit them. You can see below the RAW file, then my old HDR edit, and at the very bottom a manually blended image. For full length tutorial on manual blending see my 50 minute long video here. My Youtube channel with free photoshop tutorials Photography workshops in Tokyo - click for more details. Hire a photographer in Tokyo Buy original Chinese and Japanese calligraphy art Manually digitally blended image
In this photoshop tutorial I will show you how you can easily edit and convert a photo inside Adobe Camera Raw without having to do absolutely nothing inside photoshop. Adobe Camera Raw is a very powerful tool, and it has many amazing options. In fact Lightroom editing options are build around Camera Raw functions. This tutorial will teach you how you can control contrast and colors of your photo, perform some simple dodging and burning, manipulate with light to direct the viewers attention to the place you want them to go, and finally how to convert the photo into a nice crispy and punchy black and white. My Youtube channel with free photoshop tutorials Photography workshops in Tokyo - click for more details. Hire a photographer in Tokyo Buy original Chinese and Japanese calligraphy art It often happens so that during photo editing in photoshop or lightroom we tend to overdo the editing. Whether it is saturation, contrast or sharpness, after having a second look we see that the photo is overcooked. This is exactly what I did to this portrait shot of my wife, so I went back in to photoshop and fixed it. Then I decided to create ansho0rt tutorial for you guys. If you find it useful make sure to subscribe to my channel for more photoshop tips and tricks. My Youtube channel with free photoshop tutorials Photography workshops in Tokyo - click for more details. Hire a photographer in Tokyo Buy original Chinese and Japanese calligraphy art In this video tutorial series I will show you how you can easily create a time lapse in photoshop. I will be using Bridge, Adobe Camera RAW, and Photoshop. Tutorial is split int part 1 is about preparing the files for the time lapse, and the second part will explain how to assemble a time-lapse in photoshop. Time lapse photography is great fun, it does require a lot of patience though, and quite a bit of post processing, but thanks to photoshop and other tools, it can be automated to a great degree. If you want to learn how to create a time lapse with ease, then watch my video tutorials. My Youtube channel with free photoshop tutorials Buy fine art photo prints at my store on SmugMug. Photography workshops in Tokyo - click for more details. Hire a photographer in Tokyo In this photoshop tutorial I will show you how to create an action in photoshop, and then how to use a photoshop action to add metadata to your photos. Photoshop actions are extremely powerful tools, and can automate a lot of mundane work, and repetitive tasks that you would normally have to perform manually. I use photoshop actions mainly for adding metadata to my pictures, but I used to apply actions that were adding watermarks, sharpened my photos and resized them with one click. Actions are a must learn thing if you want to improve and speed up your workflow in photoshop. I spend anywhere between 4 to 12h (or even longer) editing photos nearly every day, depending on how much work I have, and I do a lot of manual editing of my without certain procedures being automated I would simply be unable to accomplish so much within one day. My Youtube channel with free photoshop tutorials Buy fine art photo prints at my store on SmugMug. Photography workshops in Tokyo - click for more details. Hire a photographer in Tokyo In this video I am showing you my entire workflow of fine art black and white photo conversion in photoshop. This is a sped up video, but even so it is easy to follow and understand all the steps. I am using pen tool for selections and blending 3 different exposures, then I am adjusting colours and contrast, and finally I add two small birds to the photo, so you can see some elements of composite photography. Last steps are a conversion into black and white in Silver Efex Pro and I add a vignette. If you are into black and white photography, I have yet another video tutorial on the subject, with commentaries. My Youtube channel with free photoshop tutorials Buy fine art photo prints at my store on SmugMug. Photography workshops in Tokyo - click for more details. Hire a photographer in Tokyo In most cases, brush tool is used for masking in photoshop, and brushing with white or black colour on the layer mast to reveal or conceal the layer below. Brush is also used for skin retouching, also for dodging and burning, and so on. However, it can also be used for removing unwanted items from a photo, in places and instances when the content aware tools and clone stamp tool fail to do the job. In this photoshop tutorial I will show you how you can use the brush in conjunction with layer blend modes to remove things that have to go from your photo, and improve the impact the and the composition of your shot. My Youtube channel with free photoshop tutorials Buy fine art photo prints at my store on SmugMug. Photography workshops in Tokyo - click for more details. Here is my next photoshop tutorial. This time I am giving you guys a simple tip on levels adjustment layer, and how to use them in conjunction with masking and digital blending. Recently I create more and more fully manual HDR images, I still use Photomatix and HDR efex pro 2, but not as often as I used to. It seems that manual blending, although more time consuming, produces (most of the time) better results or me. Levels in photoshop is a simple but very powerful tool, just like curves. I use levels and curves when editing nearly every photo. It is good to know how it works. Enjoy the video! My Youtube channel with free photoshop tutorials Buy fine art photo prints at my store on SmugMug. Photography workshops in Tokyo - click for more details. In this photoshop tutorial I will show you how you can easily combine texture of what is in a photograph, with any text. Most of photoshop users knows how to use the text tool, but in this video I will teach you a few cool tricks that will make any added text look really cool. By embedding the very texture of what is in a photo with the shape of the text, new tools and possibilities open and you can use your creativity to personalise any caption that you want to add to the picture. This tutorial is short and not difficult so even if you are a photoshop beginner you should have no problems with following it. My Youtube channel with free photoshop tutorials Buy fine art photo prints at my store on SmugMug. Photography workshops in Tokyo - click for more details. In this video I will show you my full workflow of how I deal with complex backlit cityscape photos. I am editing photo that contains 3 levels of depth: city at the back, bridge half way between the city and the camera, and a view deck with people just in front of me. In addition the photo is backlit during sunset hours. I will be dealing with ghosting, manual digital blending from a few exposures, removing unwanted objects with clone stamp tool and healing brush, using some content aware fill, too. I will be changing colours and saturating the photo selectively, using pen tool, and other selection tools. I will also work in Lightroom and Photoshop together, and finish it all off with some filters from Topaz and Nik (current Google software). Video tutorial on how to digitally blend images in photoshop - full workflow with many great tips Buy fine art photo prints at my store on SmugMug. Photography workshops in Tokyo - click for more details. Lots of artists use watermarks or signatures to mark their art, and they do so for various purposes. Some want to protect their work, some simply add a signature as a final touch, and others use it a business card, a sort of stamp to make it easy to find them, in case someone wishes to buy their art. Whatever the reason it might be, and if you are one of those artists that want to add a watermark to their photo or a painting in photoshop, this video is perfect for you. I am showing you how to add a personal signature to a photo, and then some cool effects options that you can play with, like bevel and emboss, or textures. If you enjoy the video, please make sure to like it and subscribe to my channel for more free photoshop and photography tutorials!  For all of you who wish to advance your photoshop and photo retouching skills, I am announcing photoshop workshops in Tokyo. I will create a special menu tab on my website this week, with all the details. For the time being I am offering only private lessons (one to one), either at your place, mine or via internet (online desktop sharing). You can view my photography and photoshop manipulation portfolio here. If interested please feel free to contact me and book your lessons! Left: original photo, that I took yesterday (model: Asuka), and below is a photo manipulation created in photoshop. Contrast of tones and colours is often an overlooked step in post processing, but in certain photos, like night photography, contrast makes a HUGE difference in the final appearance of the shot. I usually apply contrast twice or three times during post processing, and in this video I am showing you my final touches in regards to contrast.in this video, I am using curves selectively, which means that I am limiting the tonal range of curves level adjustment layer effect. Curves are an extremely powerful tool, and a photo can be actually accomplished by exclusive use of curve layers, so it is really important to master this and include them in your post processing workflow. I use curves for contrast, tones, colour correction, cross processing, and so on. |
Categories
All
AuthorPonte Ryuurui (品天龍涙) Archives
August 2020
|



 RSS Feed
