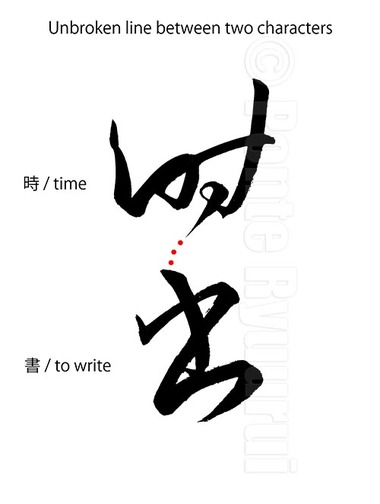
 To read more about the basic concept of unbroken line in Chinese and Japanese calligraphy, please see part 1 of this tutorial. An implied unbroken line between two characters appears in virtually any of the Chinese or Japanese masterpieces in either cursive (草書), semi-cursive (行書) or kana (かな) scripts. The reason for it is very simple, and it is directly related to the direction of writing Chinese calligraphy, but also Chinese aesthetics and philosophy. Traditionally, Chinese characters are written from the top of the page to the bottom, and right to left. Then, the general rules of the stroke order, applied during writing any of the Chinese characters, follow the direction from left to right and top to bottom. Consequently, a brush in hands of a skilled calligrapher moves freely, gliding from one character to another. Both types of the unbroken line (visible and invisible) are a natural outcome of the traditional methods of writing Chinese calligraphy. Invisible unbroken line amplifies the artistic values of calligraphy. When you look at a row of Chinese characters, connected with an invisible unbroken line, your eyes will see much more than it is written. Although the line does not exist, and the connection is only metaphysical, the calligraphy text will appear to be more expressive and richer in form. Similarly to ink painting, Chinese calligraphy is an abstract art. The beauty of both is often hidden in what is not physically sensible. The only way to understand how and where to apply the unbroken line during writing, is through diligent studies of Chinese and Japanese calligraphy masterpieces. 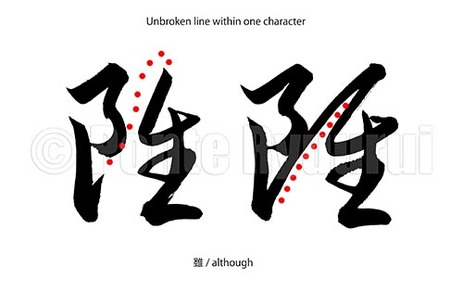 The unbroken line (連綿) is a very characteristic element to both Chinese and Japanese calligraphy art. It is easily detectable in cursive script (草書), perhaps even more defined in Japanese kana script (かな). The unbroken line technique is also applied in semi-cursive script (行書), and even some styles of standard script (楷書). The concept of the unbroken line is based on either direct or indirect (visible or invisible) connection between the strokes within one character, or between two or more characters. If you look at the above picture, you will notice that both halves of the right-hand side character 雖 (although) are connected with one brush stroke. Although, in the left-hand side character both halves are separated, the connection is invisible. The brush leaves the paper surface and traces a curved line in the air, to the point where it descends onto the paper once more, in order to complete the right half of the Chinese character. The unbroken line (especially the invisible one), aside defining / altering the structure of Chinese characters executed in a given script, it introduces a rhythm of writing. That rhythm is the foundation of writing Chinese and Japanese calligraphy (especially in "faster" scripts). To be able to apply the unbroken line technique, one has to master the stroke order of Chinese character, and rules of writing in a chosen calligraphy script. This technique does not allow for hesitant writing. I intentionally placed the unbroken line tutorials in the section referring to cursive script, because this technique is mostly used during writing in running hand. 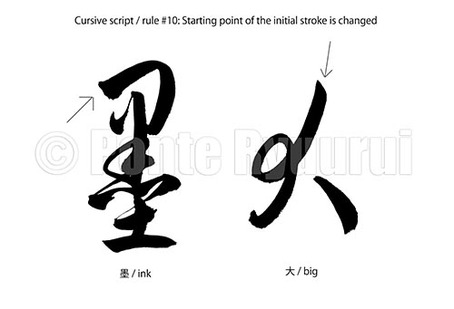 To read on the other 9 of the rules of writing in cursive script, see this menu. The 10th rule of writing Chinese calligraphy in cursive script allows for a change of the starting point of the initial stroke. This cursive script rule offers one more tool that enhances the expressiveness and fluctuant nature of cursive script. Changing of the initial position of writing a stroke alters the appearance and balance of the whole character. If you look at the character 大, you will notice that the horizontally rectangular form of this character in standard script (楷書). To fluently and freely apply the rule #10, one has to master and understand the proper stroke order of Chinese characters in standard script. The ten rules of writing Chinese calligraphy in cursive script are the foundation and the elemental knowledge required for mastering both reading and writing in running hand. 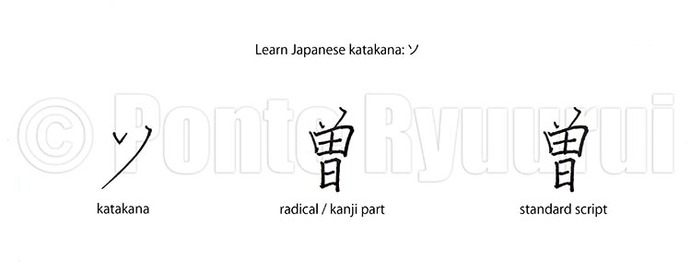 Japanese katakana syllabogram ソ is derived from the standard script (楷書) form of the Japanese kanji 曽 (formerly, once). If you look at the diagram above, you will notice that the shape of katakana ソ follows the shape of the upper part of the kanji 曽 (the two dots). The second stroke of ソ is longer, suggesting a simplification of the bottom part of the Chinese character 曽. Katakana syllabogram ソ and the hiragana そ are based on the same Japanese kanji 曽.
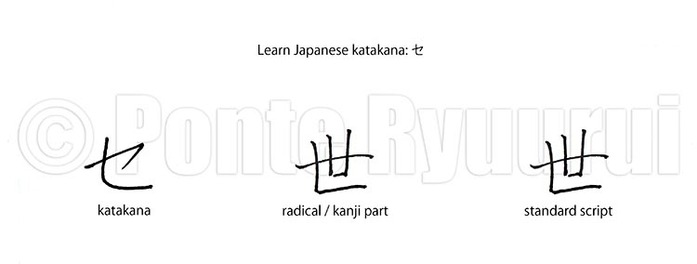 Japanese katakana syllabogram セ is derived from the standard script (楷書) form of the Japanese kanji 世 (generation, world). If you look at the diagram above, you will notice that katakana セ follows the general outline of the Chinese character 世, and it has the same stroke order. The shape of セ is quite similar to the shape of hiragana syllabogram せ. Both syllabograms are also based on the same kanji (世).
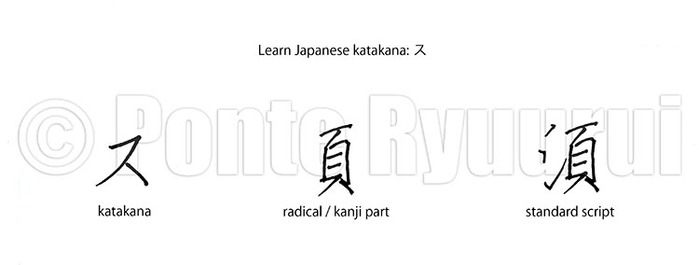 Japanese katakana syllabogram ス is derived from the standard script (楷書) form of the Japanese kanji 須 (ought, by all means), which in most of the Chinese masterpieces, is written as 湏. If you look at the diagram above, you will notice that the shape of katakana ス follows the general outline of the radical 頁 (large shell radical). The stroke order and stroke direction of both is the same.
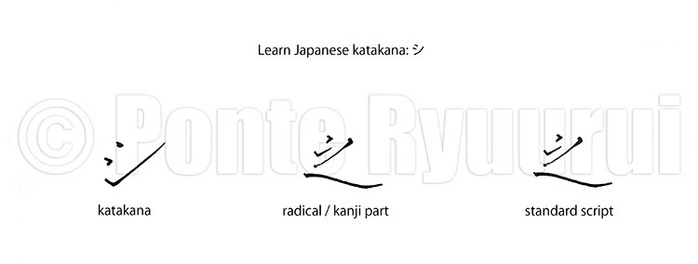 Japanese katakana syllabogram シ is derived from the standard script (楷書) form of the Japanese kanji 之 (of, this). If you look at the diagram above, you will notice that the shape of katakana シ follows the shape of kanji 之, although the direction of the third stroke of シ is different than the one in the Chinese character 之. Katakana syllabogram シ and the hiragana し are derived from the same Japanese kanji 之.
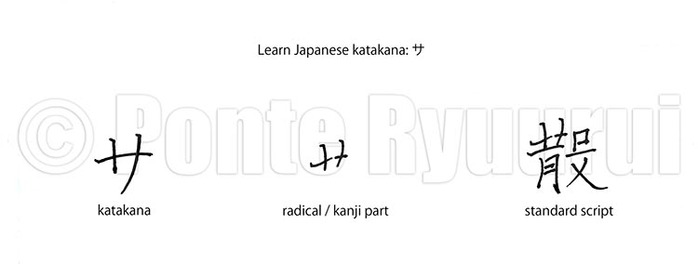 Japanese katakana syllabogram サ is derived from the standard script (楷書) form of the Japanese kanji 散 (scatter, disperse). If you look at the diagram above, you will notice that katakana サ follows the shape of the radical 艹 (grass radical), and it has the same stroke order (note: the Japanese stroke order of writing 艹 begins with the horizontal stroke, and not vertical, as the Chinese stroke order).
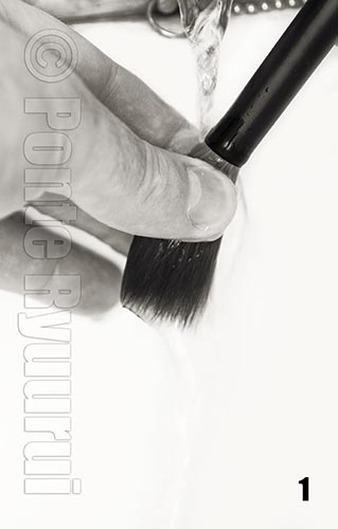
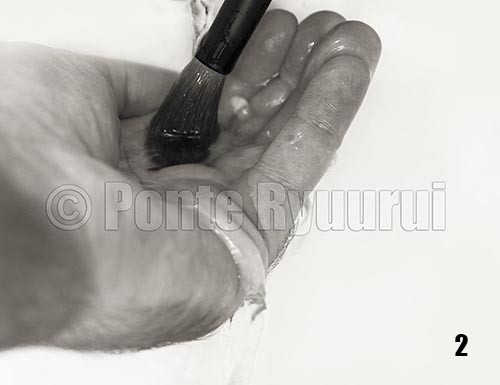
The ink used for Chinese or Japanese calligraphy is based on glue, which is often manufactured from animal bones. For this reason, calligraphy brush has to be washed immediately after writing. If the ink dries out on the brush, it will ruin it permanently. The most vulnerable and difficult to wash is the base of the tuft (see picture 1), i.e. the place where the hair is mounted inside the brush handle. This part of the calligraphy brush is where the ink dries out much faster, and it takes time to wash it off.
As shown in the picture 1, by the brush should be washed by squeezing the base of the brush tuft under running cold tap water, and without applying excessive force. To allow the tuft to sponge more water inside the part known as "the stomach" (腹), you can fold a palm of your hand into a scoop, and tap the brush inside a shallow pool of water. Brush is clean when the water squeezed out from the brush is clear. Depending on the size of the brush, washing can be quite time consuming. Washing of large calligraphy brushes (15 - 20 cm long) can take somewhere between 30 -45 minutes.
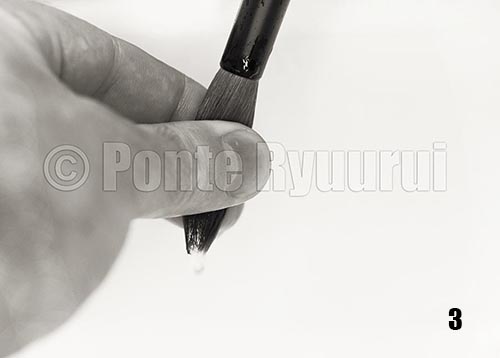
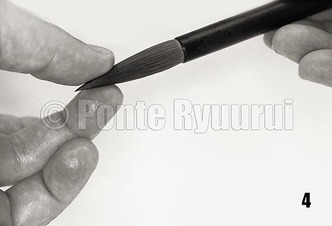
Once the brush is washed, the brush tuft should be formed into a perfectly round and pointy spear. Make sure that the hair is neatly arranged. Finally, the brush handle needs to be dried with a cloth, and hung on a brush hanger, tuft down.
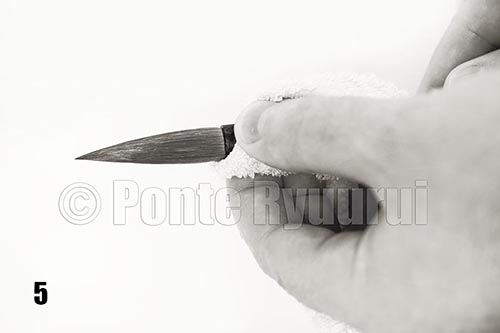
Useful tip: My advice is to wet the calligraphy brush tuft before using (following the steps shown in pictures 1, 3, 4 and 5). I have noticed that if done so, the ink dries out much slower, and it takes much shorter to wash the brush (ink is kept moist in the entire tuft). 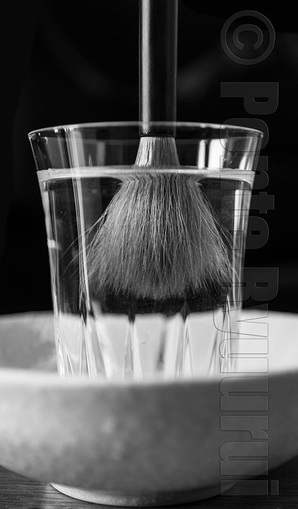 Chinese calligraphy brushes come in two major types. One type has the hair glued in a form of a spear, and the other has the hair released.
The brushes with the hair glued in a form of a spear need to be cleaned prior to using them for writing calligraphy. If the glue is not removed entirely, it will affect the brush life span, the quality of the brush strokes, and the ability of ink spreading. The glue should be removed by submerging the 3/4 to 4/5 (but never the entire tuft) of the brush a glass of tap or mineral water. The water should be cold or cool, never warm or hot. Hot water will ruin the hair and weaken the hair tips. The brush should be submerged for at least one hour. Then, the remaining glue can be easily washed off under running tap water. Some sources suggest washing the glue under running water, which is not completely incorrect, however, there are two dangers. One: the glue might not be removed completely, and two: the hair in a glued form are stiff and easy to break. Damaging the hair of the brush tuft may ruin the brush ability to deliver clear and crisp, or uniform brush strokes. Some of the brushes can be very expensive (a few hundred dollars and more), thus the knowledge of brush maintenance is crucial. 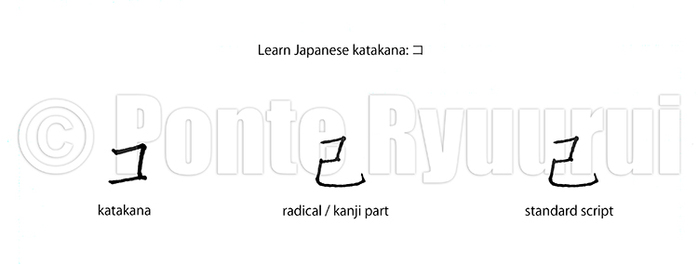 Japanese katakana syllabogram コ is derived from the standard script (楷書) form of the Japanese kanji 己 (self, snake). If you look at the diagram above, you will notice that katakana コ follows the shape of the upper part of the Japanese character 己, and it has the same stroke order. Although the shape of コ is slightly different from the shape of hiragana syllabogram こ, both syllabograms are based on the same Japanese kanji 己.
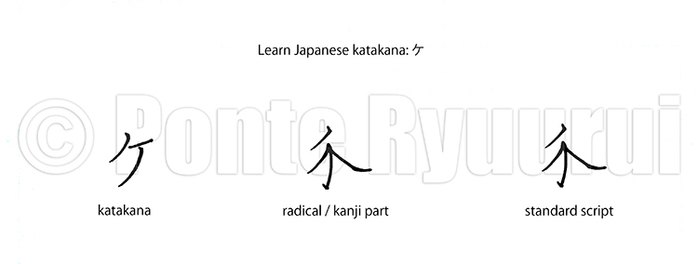 Japanese katakana syllabogram ケ is derived from the standard script (楷書) form of the Japanese kanji 介 (jammed in, mediate). If you look at the diagram above, you will notice that katakana ケ follows the handwritten shape of kanji 介, which (very often) differs from its printed form equivalent (活字). ケ follows the stroke order of the hand written form of 介.
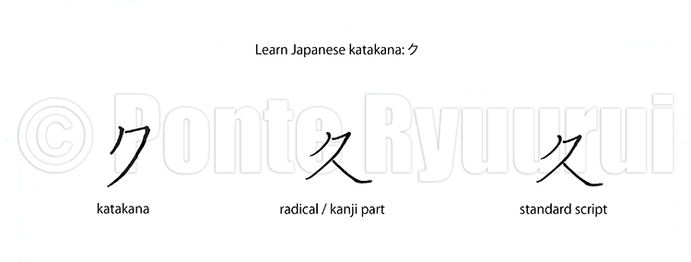 Japanese katakana syllabogram ク is derived from the standard script (楷書) form of the Japanese kanji 久 (long time, old story). If you look at the diagram above, you will notice that the shape of katakana ク is identical to the one of kanji 久, minus the right slanting stroke. ク has the same stroke order as 久. Although the shape of ク is different from the shape of hiragana syllabogram く, both syllabograms are based on the same Japanese kanji 久.
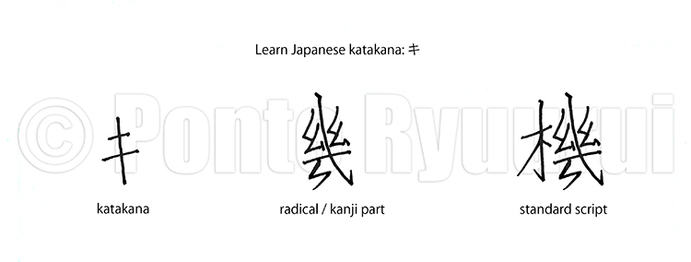 Japanese katakana syllabogram キ is derived from the standard script (楷書) form of the Japanese kanji 機 (mechanism, opportunity). If you look at the diagram above, you will notice that katakana キ follows the shape of the handwritten version of the radical 幾 (addition, increase), and it has the same stroke order. The shape of キ is quite similar to the shape of hiragana syllabogram き. Both syllabograms are also based on the same radical 幾.
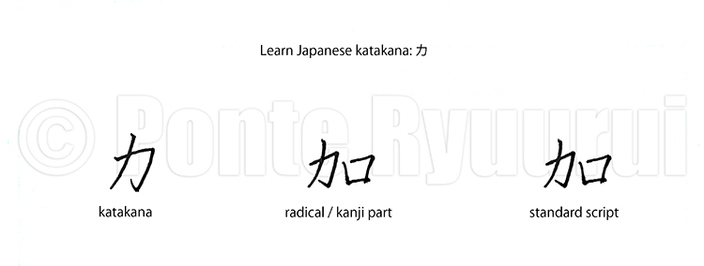 Japanese katakana syllabogram カ is derived from the standard script (楷書) form of the Japanese kanji 加 (addition, increase). If you look at the diagram above, you will notice that katakana カ follows the shape of the radical 力 (force, strength radical), and it has the same stroke order. The shape of カ is quite similar to the shape of hiragana syllabogram か. Both syllabograms are also based on the same Japanese kanji 加.
 Japanese katakana syllabogram オ is derived from the standard script (楷書) form of the Japanese kanji 於 (at, in). If you look at the diagram above, you will notice that katakana オ follows the shape of the radical 方 (direction radical). Note that the handwritten form of 方 may be (and usually is) diferent from the computer form (活字). オ follows the stroke order of the hand written form of 方. The katakana syllabogram オ is based on the same Japanese kanji as hiragana syllabogram お.
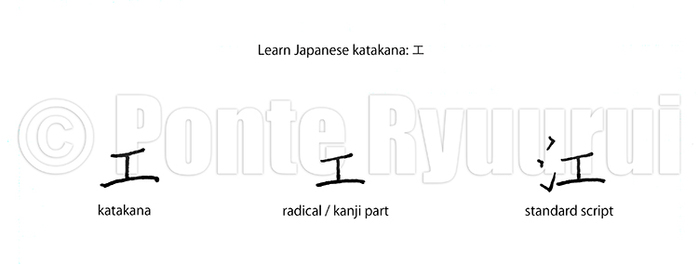 Japanese katakana syllabogram エ is derived from the standard script (楷書) form of the Japanese kanji 江 (inlet, bay). If you look at the diagram above, you will notice that katakana エ follows the shape of the radical 工 (craft), and it has the same stroke order.
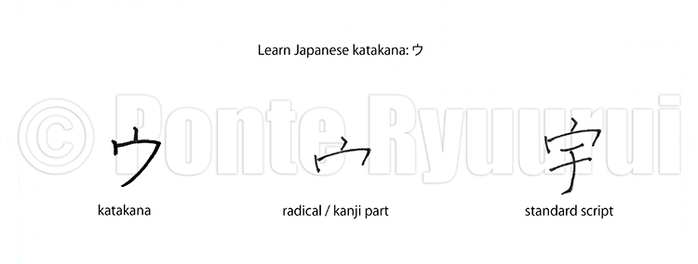 Japanese katakana syllabogram ウ is derived from the standard script (楷書) form of the Japanese kanji 宇 (eaves, roof). If you look at the diagram above, you will notice that katakana ウ follows the shape of the radical 宀 (shaped crown, roof radical), and it has the same stroke order. The shape of ウ is quite similar to the shape of hiragana syllabogram う. Both syllabograms are also based on the same Japanese kanji.
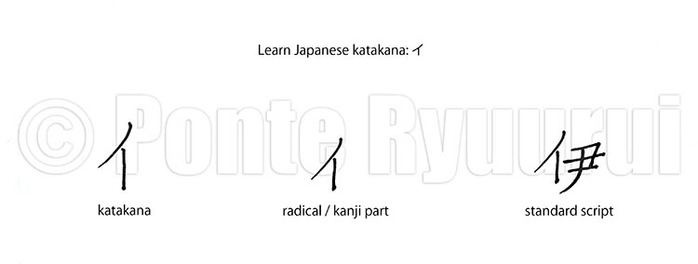 Japanese katakana syllabogram イ is derived from the standard script (楷書) form of the Japanese kanji 伊 (Italy, that one). If you look at the diagram above, you will notice that katakana イ follows the shape of the radical 亻(person radical), and it has the same stroke order.
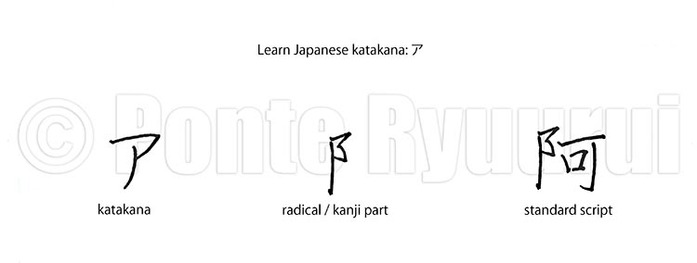 Japanese katakana syllabogram ア is derived from the standard script (楷書) form of the Japanese kanji 阿 (corner, nook). If you look at the diagram above, you will notice that katakana ア follows the shape of the radical 阝(left village radical). Syllabogram ア is a simplification of the radical 阝, and it has the same stroke order. 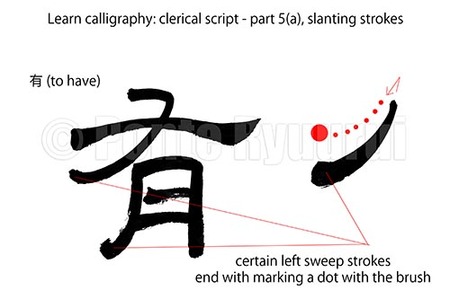 To view other tutorials on clerical script (隷書) please see here. There are five main types of strokes in each of the Chinese calligraphy scripts. Those are vertical strokes, horizontal strokes, slanting strokes, curved strokes, and dots. Each of those has multiples variants, further multiplied by the calligraphy script types. There are a few variants of slanting strokes on clerical scripts. They can be divided into two major groups, left slanting strokes and right slanting strokes. The pictured (above left) slanting stroke is a left slanting stroke, which means it slants to the left side. The key to understanding strokes in each script is to learn their characteristics and brush operating techniques. In clerical script, each stroke begins with a reverse brush movement (逆筆). However, not all strokes begin in the same manner. In fact, if you watch my other tutorials on clerical script you will notice those nuances. However, the major difference between the strokes lay in the way of leading the brush (送筆, lit. sending the brush), and ending the brush stroke (終筆). In case of this left slanting stroke, the brush pressure against the paper increases gradually, when the brush is on its way towards the end of the stroke, which causes the stroke to thicken. Finally, at the end of the stroke, the brush stops, is twisted (the brush tip marks a circle). During marking a circle, the brush pressure is lessened until the brush leaves the paper surface. See below video to see how it is done in practice. There are no more or less important strokes in Chinese calligraphy. All of them create the balance, build the character structure and even a single dot, which is badly placed or poorly executed, can ruin the whole work.
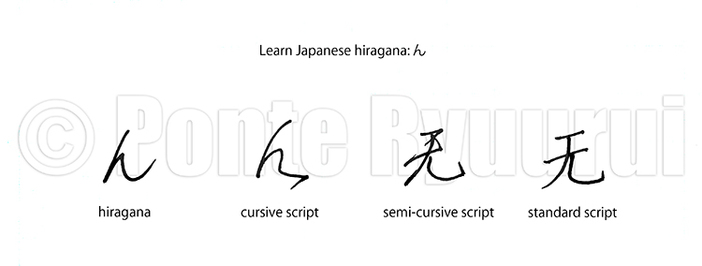 Japanese hiragana syllabogram ん is based on the cursive form the Japanese kanji 无 (nothing, naught). If you look at the diagram above, you will notice a gradual simplification and reduction of brush strokes of the Chinese character 无, starting from the standard script (楷書), through the semi-cursive script (行書), to the cursive script (草書). Syllabogram ん is a simplification of the cursive script form of 无, and it follows the same stroke order.
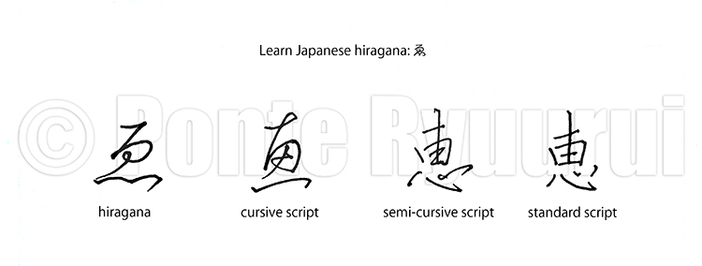 Japanese hiragana syllabogram ゑ is based on the simplified form of the cursive form the Japanese kanji 惠 (blessing, grace), i.e. 恵. If you look at the diagram above, you will notice a gradual simplification and reduction of brush strokes of the Chinese character 惠, starting from the standard script (楷書), through the semi-cursive script (行書), to the cursive script (草書). Syllabogram ゑ is a simplification of the cursive script form of 惠, and it follows the same stroke order. Note that the handwritten form of 惠 differs slightly from the computer font equivalent, although the form 恵 is also used in the electronic format. Chinese characters may have multiple variants (異体字, i.e. characters of various forms).
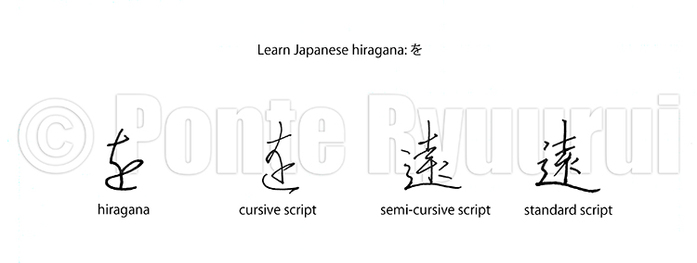 Japanese hiragana syllabogram を is based on the cursive form the Japanese kanji 遠 (distant). If you look at the diagram above, you will notice a gradual simplification and reduction of brush strokes of the Chinese character 遠, starting from the standard script (楷書), through the semi-cursive script (行書), to the cursive script (草書). Syllabogram を is a simplification of the cursive script form of 遠, and it follows the same stroke order. Note that the handwritten form of 遠 differs slightly from the computer font equivalent. This is quite common in Chinese and Japanese calligraphy.
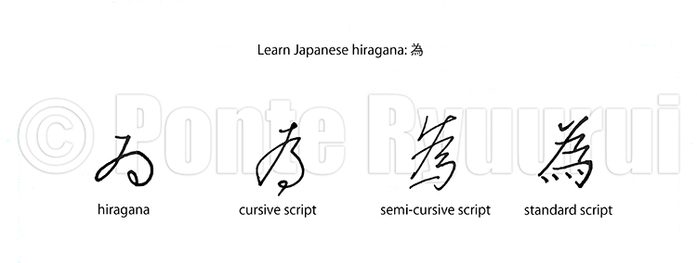 Japanese hiragana syllabogram ゐ is based on the cursive form the Japanese kanji 為 (good, advantage). If you look at the diagram above, you will notice a gradual simplification and reduction of brush strokes of the Chinese character 為, starting from the standard script (楷書), through the semi-cursive script (行書), to the cursive script (草書). Syllabogram ゐ is a simplification of the cursive script form of 為, and it follows the same stroke order.
|
Categories
All
AuthorPonte Ryuurui (品天龍涙) Archives
August 2020
|
 RSS Feed
